Perfect Ramen Eggs Ajitama- Flavorful Marinated Eggs
Ramen eggs, or Ajitama, are more than just a topping; they’re the soul-soothing centerpiece of any ramen bowl. If you’ve ever found yourself meticulously dissecting your ramen just to savor every last bit of those perfectly marinated, jammy-yolked wonders, you know exactly what I’m talking about. There’s a reason why Ramen eggs have become such a beloved component of this iconic noodle soup. It’s that incredible textural contrast – the tender, slightly firm whites giving way to a luxuriously rich, almost custard-like yolk, all infused with a deep, savory umami from the marinade. They elevate a humble bowl of ramen into something truly extraordinary, transforming it from a quick meal into an experience. Let’s unlock the secrets to creating perfect Ramen eggs right in your own kitchen.
Ramen Eggs (Ajitama)
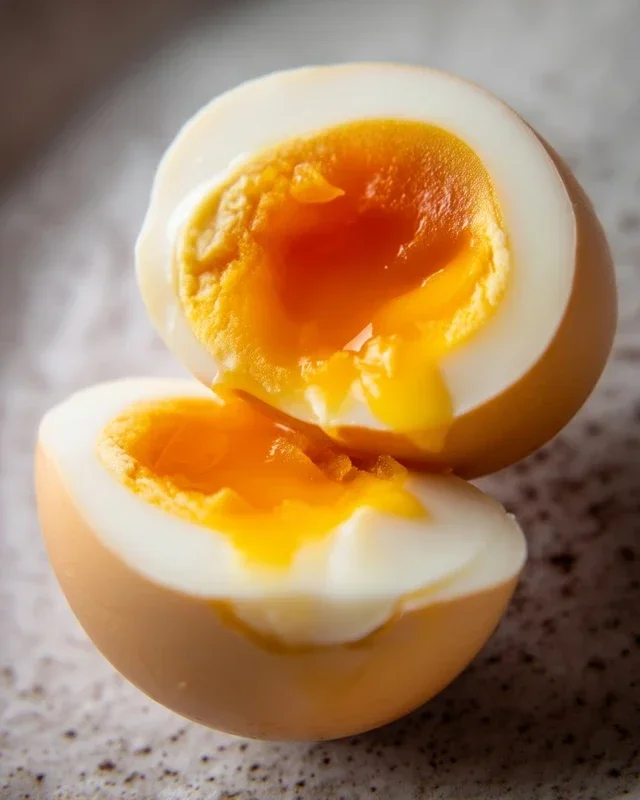
There’s something truly magical about a perfectly cooked ramen egg, or ajitama, nestled atop a steaming bowl of noodles. The soft, almost custardy yolk, infused with a savory, slightly sweet marinade, is the crowning glory of any ramen dish. While it might seem intimidating to achieve that ideal texture, I promise you, making your own ajitama at home is surprisingly simple and incredibly rewarding. Forget those sad, overcooked yolks you sometimes find; with a few key techniques, you’ll be creating restaurant-quality ramen eggs in no time. This recipe is designed to give you that coveted jammy yolk and a beautifully seasoned white, ready to elevate your ramen or even just be enjoyed as a delicious snack on its own.
Ingredients:
*Note on eggs: For the best results and easiest peeling, I highly recommend using eggs that are a few days old. Fresher eggs tend to be harder to peel without damagin extractg the whites. If you only have very fresh eggs, you can try a slightly longer boil, but be prepared for a bit more fuss when peeling.
Cooking Instructions:
Boiling the Eggs
The first crucial step to achieving the perfect ajitama is the boiling of the eggs. This is where we aim for that beautiful, jammy yolk. Start by gently placing your eggs into a saucepan. You want to ensure they are in a single layer. Cover the eggs with cold water by about an inch. This ensures even cooking. If you’re using the optional vinegar, add a splash (about a teaspoon) to the water. The vinegar helps the egg whites coagulate more quickly if a shell cracks, which can prevent excessive leakage and make peeling slightly easier.
Place the saucepan over medium-high heat and bring the water to a rolling boil. As soon as the water reaches a vigorous boil, immediately turn off the heat. This is the secret! Don’t continue boiling the eggs. Instead, cover the saucepan tightly with a lid.
Now, let the eggs sit undisturbed in the hot water for precisely 6 to 7 minutes. The exact timing can be a bit personal depending on your stove and how you like your yolks, but 6.5 minutes is my sweet spot for a perfectly jammy, not-quite-runny yolk. While the eggs are sitting, prepare an ice bath. Fill a medium-sized bowl with cold water and a generous amount of ice cubes. This ice bath is critical for stopping the cooking process instantly. After the 6 to 7 minutes are up, use a slotted spoon to carefully transfer the eggs from the hot water directly into the ice bath. Let them chill there for at least 10 minutes. This rapid cooling not only stops the cooking but also makes the eggs much easier to peel.
Peeling the Eggs
Once the eggs have cooled sufficiently in the ice bath, it’s time to peel them. Gently tap each egg on a hard surface, like your countertop, to crack the shell all over. Then, start peeling under cool running water. The running water helps to lubricate the shell and membrane, making it easier to slip them off cleanly. Gently roll the egg between your hands to loosen the shell further. Take your time with this step; the goal is to have pristine, unblemished egg whites. If you encounter any stubborn bits of shell or membrane, carefully pick them away with your fingertips or a small paring knife. The better you peel them now, the more visually appealing your finished ramen eggs will be.
Preparing the Marinade
While your eggs are chilling or being peeled, it’s time to whip up the delicious marinade that will give your ajitama its signature flavor. In a small saucepan, combine the light sodium soy sauce, water, non-non-non-alcoholic alternativeic non-alcoholic mirin, and granulated sugar. Stir everything together until the sugar is completely dissolved. You can heat this mixture gently over low heat, stirring constantly, until the sugar is dissolved and the liquids are just warmed through. Avoid bringin extractg it to a boil, as this can evaporate some of the non-alcoholic alternative from the non-alcoholic mirin (if using a non-alcoholic mirin with a small amount of non-alcoholic alternative) and potentially alter the flavor profile. Once the sugar is dissolved, remove the saucepan from the heat and let the marinade cool slightly.
Marinating the Eggs
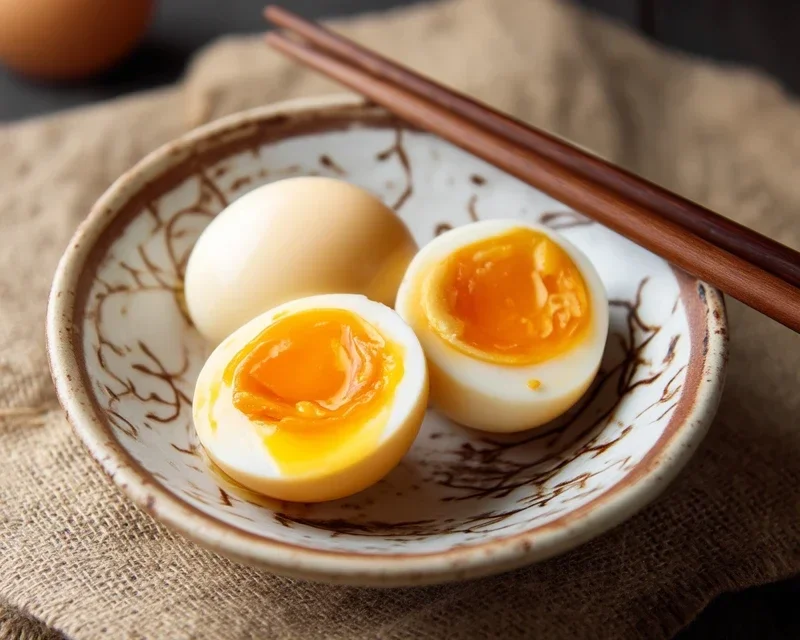
This is where the magic truly happens. Once your eggs are peeled and your marinade has cooled to room temperature (or is just slightly warm), it’s time to let them soak. You can marinate your eggs in a few ways. A simple and effective method is to place the peeled eggs in a small, sealable container or a zip-top bag. Pour the cooled marinade over the eggs, ensuring they are fully submerged. If you’re using a container, you might want to gently turn the eggs a couple of times during the marinating period to ensure even flavor distribution.
Now, seal the container or bag and refrigerate. The ajitama need to marinate for at least 4 hours, but for the best flavor penetration, I highly recommend letting them marinate overnight, or even for up to 24 hours. The longer they marinate, the deeper and more complex the flavor will become. You’ll notice the egg whites starting to take on a beautiful amber hue as they absorb the delicious marinade.
Serving Your Ajitama
After the marinating period is complete, your ramen eggs are ready to be enjoyed! Carefully remove the eggs from the marinade. You can discard the leftover marinade or save it to use as a dipping sauce for other dishes or even as a base for more marinade for your next batch of eggs. To serve, you can either halve the eggs lengthwise with a sharp knife, revealing that glorious jammy yolk, or serve them whole. Place them on top of your favorite ramen, or enjoy them on their own. They are a fantastic addition to bento boxes, salads, or even as a simple, protein-rich snack. The flavor is rich and savory, with a subtle sweetness that perfectly complements the tender egg white and custardy yolk. Experiment with different marinating times to find your perfect level of flavor infusion!
Conclusion:
And there you have it! Crafting perfect Ramen Eggs, or Ajitama, is a truly rewarding experience. These beautifully marinated, jammy-yolked eggs are so much more than just a ramen topping. They’re a flavor bomb, a testament to simple ingredients elevated through a little patience and a delicious marinade. The combination of soy sauce, non-alcoholic mirin, non-alcoholic sake, and sugar creates a sweet, savory, and umami-rich coating that seeps into the egg white and infuses the yolk with incredible depth. I truly believe anyone can master this recipe and elevate their home-cooked meals to a new level.
Don’t limit yourself to just ramen! These versatile Ramen Eggs are fantastic sliced over rice bowls, tucked into sandwiches, added to salads, or even enjoyed on their own as a flavorful snack. Feel free to experiment with the marinade too! Some people love adding a touch of garlic, gin extractger, or even a pinch of chili flakes for a little kick. The key is to find what sings to your palate. So, I encourage you to dive in, give this recipe a try, and discover the magic of perfectly marinated Ramen Eggs for yourself. You won’t regret it!
Frequently Asked Questions about Ramen Eggs (Ajitama):
Q: How long do Ramen Eggs last in the refrigerator?
A: Properly stored in their marinade in an airtight container, Ramen Eggs will typically stay fresh and delicious in the refrigerator for about 3 to 4 days. The marinade acts as a preservative, so they’re quite stable.
Q: Can I use a different type of soy sauce?
A: Absolutely! While Japanese soy sauce is traditional and recommended for its balanced flavor, you can experiment. If you use a darker, saltier soy sauce, you might want to slightly reduce the amount of soy sauce in the marinade and potentially add a touch more sugar or non-alcoholic mirin to balance it out. Low-sodium soy sauce is also an option, but again, you might adjust sweetness and saltiness accordingly.
Q: My egg yolks aren’t perfectly jammy, they’re a bit too hard or too runny. What did I do wrong?
A: The key to a jammy yolk lies in the boiling time and the rapid cooling. For a jammy yolk, aim for 6 to 7 minutes of boiling time, followed immediately by an ice bath. If your yolks are too hard, reduce the boiling time slightly next time. If they’re too runny, increase it by a minute. The ice bath is crucial to stop the cooking process and achieve that perfect consistency.
Ramen Eggs (Ajitama)
Perfectly seasoned soft-boiled eggs marinated in a savory soy-based liquid, ideal for topping ramen or as a snack.
Ingredients
-
6 large eggs
-
½ cup light sodium soy sauce
-
¼ cup water
-
¼ cup non-alcoholic mirin
-
2 tablespoons granulated sugar
-
1 tablespoon rice vinegar (optional for boiling)
Instructions
-
Step 1
Carefully place the eggs in a pot and cover with cold water. Add optional vinegar to the water. -
Step 2
Bring the water to a rolling boil over medium-high heat. Once boiling, reduce heat slightly and cook for 6-7 minutes for a jammy yolk. -
Step 3
While eggs cook, whisk together soy sauce, water, non-alcoholic mirin, and granulated sugar in a medium bowl until sugar is dissolved. -
Step 4
Transfer the cooked eggs to an ice bath immediately to stop the cooking process. Let them cool for at least 5 minutes. -
Step 5
Gently peel the cooled eggs. -
Step 6
Place the peeled eggs in a resealable bag or container and pour the soy sauce mixture over them, ensuring they are fully submerged. Marinate in the refrigerator for at least 4 hours, or preferably overnight for best flavor.
Important Information
Nutrition Facts (Per Serving)
It is important to consider this information as approximate and not to use it as definitive health advice.
Allergy Information
Please check ingredients for potential allergens and consult a health professional if in doubt.