Easy Homemade Fruit Leather Recipe- Delicious Snack
Homemade fruit leather is one of those magical treats that instantly transports me back to childhood. There’s something incredibly satisfying about unwrapping that tangy, chewy strip, a burst of pure fruit flavor that’s both sweet and tart. Why do we all seem to love homemade fruit leather so much? It’s the ultimate portable snack, a healthy alternative to store-bought candies, and surprisingly simple to create yourself. What truly makes it special is the ability to customize it entirely with your favorite fruits. Imagin extracte the possibilities – a vibrant strawberry-rhubarb explosion, a tropical mango-pineapple delight, or a classic apple cinnamon. This homemade fruit leather recipe allows you to harness the natural goodness of fruit, creating a delicious and wholesome treat that’s perfect for lunchboxes, hiking adventures, or just a guilt-free indulgence. Let’s dive into making your own batch of this delightful snack!
Homemade Fruit Leather Recipe
There’s something incredibly satisfying about making your own fruit leather. It’s a healthier, tastier alternative to store-bought versions, and it’s surprisingly easy to whip up. Plus, the possibilities for flavor combinations are endless! This recipe is a fantastic starting point, utilizing simple ingredients to create a delightfully chewy and naturally sweet treat. Imagin extracte tangy lemon cutting through the sweetness of ripe fruit, creating a perfectly balanced flavor explosion. This is the perfect project for a lazy afternoon, and the results are sure to be a hit with kids and adults alike.
Ingredients:
Cooking Instructions:
1. Prepare Your Fruit
The first step is to get your fruit ready. You can use almost any fruit you like for fruit leather! Berries, stone fruits like peaches and apricots, apples, pears, and even tropical fruits like mangoes and pineapples work wonderfully. For this recipe, I’m using 2 cups of chopped fruit. If you’re using apples or pears, you’ll want to peel them first. If you’re using berries, you can leave them whole if they’re small, or halve them if they’re larger. Stone fruits should be pitted and chopped into roughly uniform pieces. The goal is to have them break down easily during cooking. My personal favorite is a mix of strawberries and raspberries for a vibrant color and classic flavor.
2. Cook Down the Fruit
Now it’s time to transform your chopped fruit into a smooth puree. In a medium saucepan, combine your 2 cups of chopped fruit with 3 tablespoons of white sugar and the juice of ½ a lemon. The sugar will help sweeten the fruit and also aid in preservation, while the lemon juice adds a lovely tang and helps to brighten the flavors.
Place the saucepan over medium heat. Stir the ingredients together well. You’ll want to bring the mixture to a gentle simmer. Once it’s simmering, reduce the heat to low and continue to cook, stirring occasionally, for about 10-15 minutes. During this time, the fruit will soften considerably and release its natural juices. The goal here is to break down the fruit into a mushy consistency that can be easily pureed. If your fruit is particularly dry, you might need to add a tablespoon or two of water to prevent it from sticking to the bottom of the pan. Keep an eye on it and stir regularly to ensure even cooking.
3. Create a Smooth Puree
Once the fruit has softened and cooked down, it’s time to make it smooth. You have a couple of options here. You can carefully transfer the cooked fruit mixture to a blender and blend until it’s completely smooth. Be very cautious when blending hot liquids! Alternatively, you can use an immersion blender directly in the saucepan. This is often my preferred method as it involves less cleanup. Blend until there are no more chunks of fruit and you have a silky, smooth consistency. If you prefer a slightly textured fruit leather, you can pulse the blender a few times instead of going for a perfectly smooth puree.
4. Dehydrate or Bake Your Fruit Leather
This is where the magic happens! You’ll need to remove the moisture from your fruit puree to create that characteristic chewy texture. The most common methods are using a food dehydrator or your oven.
Using a Food Dehydrator: If you have a food dehydrator, this is the easiest route. Spread the fruit puree evenly onto your dehydrator trays, typically lined with parchment paper or a dehydrator sheet. Aim for a thickness of about 1/8 to 1/4 inch. Dehydrate at around 135°F (57°C) for 6-12 hours, or until the fruit leather is no longer sticky to the touch and peels easily from the liner. The exact time will depend on the thickness of your leather and the humidity.
Using Your Oven: If you don’t have a dehydrator, your oven can do the job. Preheat your oven to its lowest setting, usually around 170-200°F (77-93°C). Line a baking sheet with parchment paper or a silicone baking mat. Spread the fruit puree evenly onto the parchment paper in a thin, uniform layer, again aiming for about 1/8 to 1/4 inch thickness. Place the baking sheet in the preheated oven. You’ll want to prop the oven door open slightly with a wooden spoon to allow moisture to escape. Bake for 2-5 hours, checking frequently. The fruit leather is ready when it’s no longer wet or sticky and has a slightly leathery texture. Be patient with this method, as oven temperatures can vary, and it’s important not to overcook it and turn it into a hard candy.
5. Cool and Cut
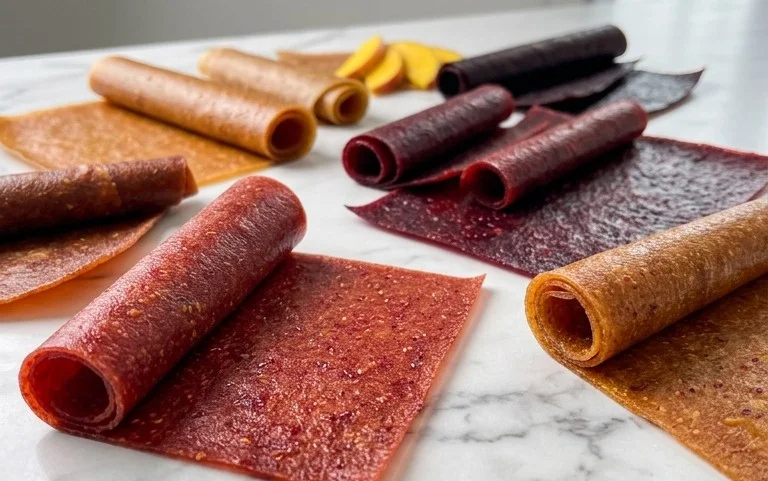
Once your fruit leather has reached the desired consistency, carefully remove it from the dehydrator or oven. If using parchment paper, let it cool completely on the baking sheet or a cooling rack. As it cools, it will firm up even more. Once completely cool, you can peel the fruit leather off the parchment paper. Now comes the fun part – cutting! You can cut it into strips, squares, or use cookie cutters to make fun shapes. I like to cut mine into strips about 1 inch wide and then roll them up. This makes them easy to store and handle.
Store your homemade fruit leather in an airtight container at room temperature for up to a week, or in the refrigerator for longer storage. Enjoy your delicious, homemade fruit leather guilt-free!

Conclusion:
You’ve now got all the tools to create your very own delicious homemade fruit leather! This recipe is fantastic because it’s incredibly versatile, allowing you to use whatever fruits are in season or your favorites. It’s a wonderfully healthy and fun snack that’s perfect for lunchboxes, after-school treats, or even a guilt-free dessert. The process is simple, and the satisfaction of peeling a perfectly chewy strip of homemade goodness is truly rewarding.
I highly encourage you to give thishomemade fruit leather recipea try! It’s a fantastic way to reduce food waste by using up ripe produce and is so much more budget-friendly than store-bought options. Plus, you control exactly what goes into it – no added sugars or artificial ingredients needed!
Frequently Asked Questions:
What fruits work best for fruit leather?
Almost any fruit can be turned into delicious fruit leather! Berries like strawberries, raspberries, and blueberries are wonderful. Stone fruits such as peaches, plums, and apricots are also excellent choices. Apples and pears offer a great base, and tropical fruits like mango and pineapple add a delightful twist. You can even combine different fruits for unique flavor profiles. Just ensure they are ripe for maximum sweetness and flavor.
How long does homemade fruit leather last?
When stored properly, homemade fruit leather can last for several weeks. Ensure it’s completely cooled before cutting and wrapping it tightly in plastic wrap or parchment paper. Store it in an airtight container at room temperature if you plan to consume it within a week or two. For longer storage, keep it in the refrigerator, where it can easily last for up to a month. Freezing is also an option for even longer preservation.
Can I make fruit leather without added sugar?
Absolutely! The beauty of making fruit leather at home is that you can rely on the natural sweetness of ripe fruits. If you find your fruit blend is a bit tart, a tiny drizzle of honey or maple syrup can be added, but it’s often unnecessary, especially when using very ripe fruits. This makes it an ideal snack for children and those looking for healthier treat options.
Homemade Fruit Leather
Create delicious and healthy homemade fruit leather with this simple recipe.
Ingredients
-
2 cups fruit, chopped
-
3 tbsp white sugar
-
1/2 whole lemon, just the juice
-
1/4 cup water
-
1 tsp cornstarch
-
Pinch of salt
Instructions
-
Step 1
Combine chopped fruit and white sugar in a saucepan. -
Step 2
Add the lemon juice and water to the saucepan. -
Step 3
Cook over medium heat, stirring occasionally, until the fruit is softened and the mixture is juicy. -
Step 4
Blend the fruit mixture until smooth. If using an immersion blender, do this directly in the saucepan. Otherwise, carefully transfer to a regular blender. -
Step 5
Return the pureed fruit to the saucepan. Whisk in the cornstarch and salt. -
Step 6
Cook, stirring constantly, until the mixture thickens to a pudding-like consistency. -
Step 7
Pour the mixture onto a parchment-lined baking sheet, spreading it thinly and evenly. -
Step 8
Bake at the lowest oven temperature (around 150-170°F or 65-75°C) for 4-6 hours, or until the fruit leather is no longer sticky to the touch. The exact time will depend on your oven and the thickness of the leather. -
Step 9
Let cool completely on the baking sheet before peeling off the parchment paper and cutting into strips.
Important Information
Nutrition Facts (Per Serving)
It is important to consider this information as approximate and not to use it as definitive health advice.
Allergy Information
Please check ingredients for potential allergens and consult a health professional if in doubt.