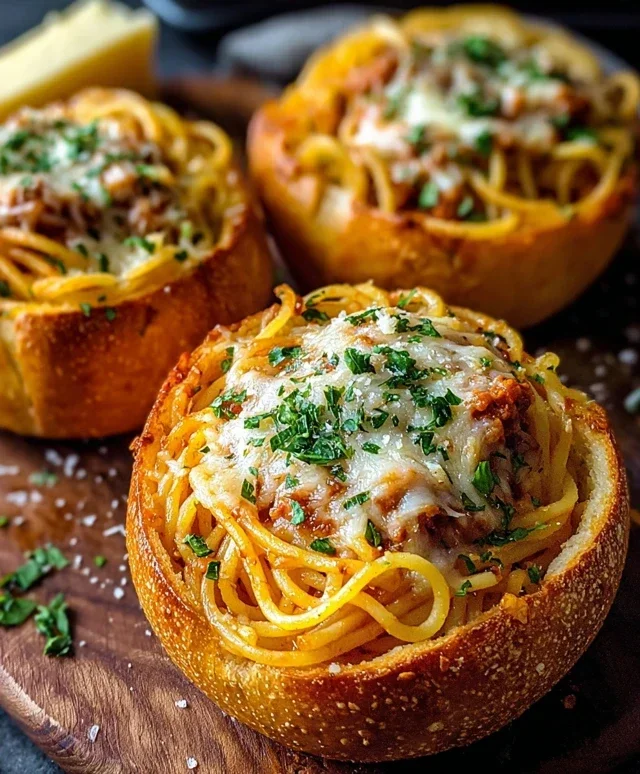
Spaghetti Garlic Bread Bowls – Your New Favorite Meal
Spaghetti Garlic Bread Bowls are more than just a meal; they’re an edible masterpiece that ignites pure joy and satisfies every craving. Imagin extracte the comforting embrace of perfectly cooked spaghetti, swimming in a rich, flavorful sauce, all nestled within a crispy, golden vessel of garlic bread. It’s a concept that has captured the hearts (and stomachs) of food lovers everywhere, and for good reason! This dish takes two universally beloved comfort foods and elevates them into something truly extraordinary. The magic lies in the ingenious fusion – the savory, garlicky aroma of the bread bowl mingling with the saucy goodness of the spaghetti. It’s the ultimate culinary hug, perfect for a cozy night in or a fun gathering with friends.
Why You’ll Fall in Love
Get ready to experience a dish that’s as fun to eat as it is delicious!
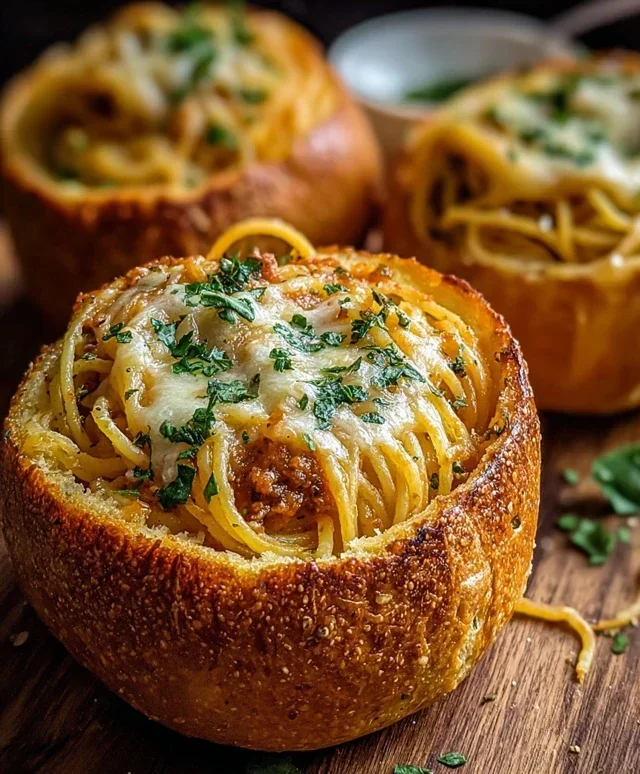
Spaghetti Garlic Bread Bowls
Are you ready for a seriously satisfying, show-stopping meal? These Spaghetti Garlic Bread Bowls are a fun and delicious twist on a classic, perfect for a cozy night in or even a casual dinner party. Imagin extracte tender spaghetti tossed in a rich, savory meat sauce, all served up in a warm, crispy, garlic-infused bread bowl. It’s the ultimate comfort food experience, and I promise, it’s easier to make than you might think!
Let’s get down to business with what you’ll need to create these edible masterpieces.
Ingredients:
Now, let’s get cooking!
Preparing the Garlic Bread Bowls
First things first, we need to get those bread bowls ready to receive their delicious filling. Preheat your oven to 375°F (190°C). Take your 6 crusty white rolls and, using a sharp knife, carefully cut a circle around the top of each roll, about an inch from the edge. Don’t cut all the way through to the bottom. You want to create a lid that you can lift off. Once you’ve made the cut, gently hollow out the inside of each roll, leaving about a half-inch to an inch of bread all around the sides and bottom to create a sturdy bowl. You can save the scooped-out bread for making breadcrum extractbs later, or even toast it up to dip into your sauce!
In a small bowl, combine your melted butter, garlic paste, chopped fresh parsley, and grated Parmesan cheese. Mix this all together until it forms a lovely, fragrant spread. Now, generously brush the inside of each hollowed-out roll, including the “lid,” with this garlic butter mixture. Make sure you get into all the nooks and crannies. Place the prepared rolls, cut-side up, on a baking sheet. We’ll bake these until they’re golden brown and slightly crispy, which should take about 10-15 minutes. Keep an eye on them so they don’t burn. Once they’re done, remove them from the oven and set them aside.
Making the Rich Spaghetti Sauce
While your bread bowls are getting toasty, let’s get started on the star of the show: the spaghetti sauce. Heat a large, oven-safe skillet or Dutch oven over medium-high heat. Add your ground beef and cook, breaking it up with a spoon, until it’s nicely browned. Drain off any excess grease.
Add your diced onion to the skillet with the browned beef and cook until the onion is softened and translucent, about 5-7 minutes. Stir in the minced garlic and cook for another minute until fragrant, being careful not to burn the garlic. Next, add the tomato paste and cook, stirring constantly, for about 1-2 minutes. This step helps to deepen the flavor of the tomato paste.
Now, it’s time to build the sauce. Pour in the red grape juice and scrape the bottom of the pan to loosen any browned bits – that’s where a lot of the flavor is! Let the grape juice simmer and reduce slightly for a minute or two. Then, stir in the tomato passata, beef stock, Worcestershire sauce, sugar, and dried oregano. Bring the sauce to a simmer, then reduce the heat to low, cover, and let it cook for at least 20-30 minutes. The longer it simmers, the more the flavors will meld and deepen. You want a rich, thick sauce that’s packed with flavor. Season with salt and pepper to your taste.
Assembling and Baking the Bowls
Once your sauce has simmered and your garlic bread bowls are out of the oven and slightly cooled, it’s time for the grand assembly. If you’re cooking spaghetti separately, cook it according to package directions. We want the spaghetti to be al dente, meaning it still has a slight bite to it. Drain the spaghetti well.
Now, you have a couple of options for combining the spaghetti and sauce. You can either gently fold the cooked spaghetti directly into the sauce in the skillet, ensuring every strand is coated, or you can ladle some sauce into each bread bowl first and then top it with a generous portion of spaghetti. I personally love mixing it all together in the skillet; it makes for a more cohesive dish.
Carefully spoon the spaghetti and sauce mixture into each of your prepared garlic bread bowls, filling them generously. Don’t be afraid to pile it high! Place the lids back on top of the filled bowls.
Return the filled bowls to the oven, uncovered this time. Bake for another 10-15 minutes, or until the bread bowls are golden brown and crispy on the outside, and the filling is heated through and bubbly. If you like your cheese extra melty and golden, you can sprinkle a little extra Parmesan cheese on top of the lids during the last few minutes of baking.
Serve these incredible Spaghetti Garlic Bread Bowls immediately while they’re hot and the bread is wonderfully crispy. They are a complete meal in themselves, so you likely won’t need much else on the side, though a simple green salad would be a nice accompaniment. Enjoy every single delicious bite!
Conclusion:
I hope you’ve enjoyed learning how to make these delightful Spaghetti Garlic Bread Bowls! This recipe truly is a winner because it takes two comfort food classics and combines them into one incredibly satisfying meal. The crispy, garlicky bread bowl perfectly cradles your favorite spaghetti, creating a fantastic edible vessel that adds an extra layer of flavor and texture to every bite. It’s visually impressive and utterly delicious, making it perfect for a weeknight family dinner or even a fun gathering with friends.
For serving, these bowls are a meal in themselves! However, a simple side salad with a light vinaigrette or some steamed broccoli would be excellent accompaniments. You can also get creative with variations! Try adding a sprinkle of red pepper flakes to the garlic butter for a spicy kick, or mix in some chopped fresh parsley or chives for extra herbaceousness. Feel free to experiment with different cheeses, like a sharp cheddar or a salty Parmesan, sprinkled on top before baking the bowls. I truly encourage you to give this Spaghetti Garlic Bread Bowls recipe a try – it’s a culinary adventure that’s guaranteed to impress!
Frequently Asked Questions:
Can I make the garlic bread bowls ahead of time?
Yes, you can definitely prepare the garlic bread bowls ahead! Once you’ve hollowed out the bread and brushed them with the garlic butter mixture, you can wrap them tightly in plastic wrap and refrigerate them for up to 24 hours. When you’re ready to bake, simply remove them from the refrigerator, brush with a little more garlic butter if needed, and proceed with the recipe as directed. You might need to add a few extra minutes to the baking time.
What kind of bread works best for these bowls?
A sturdy, crusty bread is ideal for making Spaghetti Garlic Bread Bowls. Loaves like French bread, ciabatta, or even a good quality sourdough work wonderfully. The key is to choose a bread that holds its shape well when hollowed out and can stand up to being filled with pasta without becoming too soggy. Avoid soft, airy sandwich breads as they tend to fall apart.
Can I freeze the baked garlic bread bowls?
While you can freeze the baked garlic bread bowls, they are best enjoyed fresh. If you do choose to freeze them, allow them to cool completely first. Wrap them tightly in plastic wrap and then in aluminum foil or place them in an airtight container. To reheat, you can warm them in a moderate oven until heated through. However, they may lose some of their origin extractal crispiness.
Spaghetti Garlic Bread Bowls
Savory spaghetti and beef filling baked inside hollowed-out garlic bread bowls.
Ingredients
-
6 crusty white rolls
-
1/2 cup butter, melted
-
2 garlic cloves, made into paste
-
1 tablespoon fresh parsley, chopped
-
2 tablespoons grated Parmesan cheese
-
1 pound ground pork
-
1 medium onion, diced
-
3 garlic cloves, minced
-
1 tablespoon tomato paste
-
1/2 cup red grape juice
-
2 cups tomato passata
-
1 cup beef stock
-
1/2 tablespoon Worcestershire sauce
-
1/2 teaspoon sugar
-
1/2 teaspoon dried oregano
Instructions
-
Step 1
Preheat oven to 375°F (190°C). Slice off the top third of each roll and scoop out the insides to create bowls, leaving a 1/2-inch thick shell. Brush the inside and outside of the rolls with half of the melted butter. Place on a baking sheet and bake for 10-12 minutes until lightly golden. Set aside. -
Step 2
In a large skillet, brown the ground pork over medium heat. Drain off any excess fat. Add the diced onion and minced garlic, and cook until softened, about 5 minutes. -
Step 3
Stir in the tomato paste and cook for 1 minute. Add the red grape juice and scrape up any browned bits from the bottom of the pan. Bring to a simmer and cook until the liquid has reduced by half. -
Step 4
Pour in the tomato passata and beef stock. Add the Worcestershire sauce, sugar, and dried oregano. Stir well to combine. Bring to a simmer, then reduce heat and cook for 15-20 minutes, stirring occasionally, until the sauce has thickened. -
Step 5
In a small bowl, combine the remaining melted butter, garlic paste, chopped parsley, and grated Parmesan cheese. Mix until well combined. -
Step 6
Spoon the meat sauce evenly into the prepared bread bowls. Top each bowl with a generous amount of the garlic butter mixture. -
Step 7
Place the filled bowls back on the baking sheet and bake for another 10-15 minutes, or until the filling is hot and the garlic butter topping is bubbly and golden brown.
Important Information
Nutrition Facts (Per Serving)
It is important to consider this information as approximate and not to use it as definitive health advice.
Allergy Information
Please check ingredients for potential allergens and consult a health professional if in doubt.