Easy Cherry Turnovers- Delicious & Simple Dessert
Easy Cherry Turnovers are your passport to pure pastry perfection, and believe me, they’re even simpler to make than they sound. Who doesn’t adore the delightful contrast of a flaky, golden crust embracing a warm, sweet-tart cherry filling? It’s a classic for a reason, conjuring up cozy memories and satisfying those irresistible sweet cravings. What truly sets these easy cherry turnovers apart is their effortless charm; you don’t need to be a seasoned baker to achieve bakery-worthy results. We’re talking about a recipe so straightforward, so forgiving, that even a weeknight can become an occasion for this comforting treat. Get ready to impress yourself and anyone lucky enough to share these incredible easy cherry turnovers with you.
Easy Cherry Turnovers
There’s something incredibly satisfying about a warm, flaky pastry bursting with sweet, tangy fruit. These Easy Cherry Turnovers are the perfect example. They look impressive, taste divine, and are surprisingly simple to make, making them ideal for a quick dessert, a brunch treat, or even a special breakfast. The secret to their ease? Pre-made puff pastry! It’s a lifesaver for busy bakers and delivers that signature buttery crispness without all the fuss of traditional pastry making. Whether you’re a seasoned baker or just starting out, you’ll find this recipe a delightful and rewarding experience. Let’s get started!
Ingredients:
Instructions:
Preparation and Pastry Handling
The first crucial step for success is to ensure your puff pastry is properly thawed. Most packages will recommend thawing it in the refrigerator overnight. If you’re in a pinch, you can thaw it at room temperature, but keep a close eye on it. You want it pliable enough to work with, but not so warm that it becomes greasy or difficult to handle. Over-handling can also affect the flakiness, so be gentle. Once thawed, gently unfold the puff pastry sheets onto a lightly floured surface. If the pastry feels a bit stiff, let it sit at room temperature for another 10-15 minutes. It should be flexible enough to cut without tearing. Using a sharp knife or a pizza cutter, I like to cut each sheet into four equal squares. This will give you eight turnovers in total.
Assembling the Turnovers
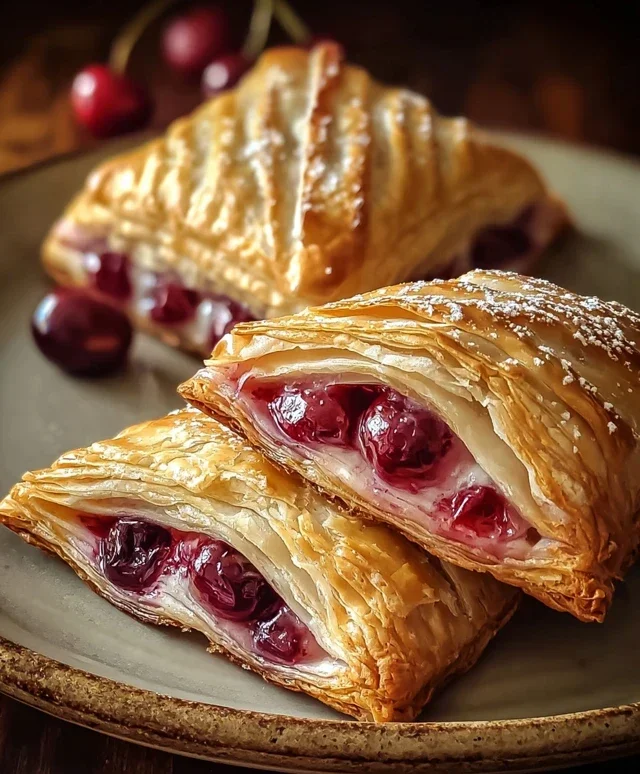
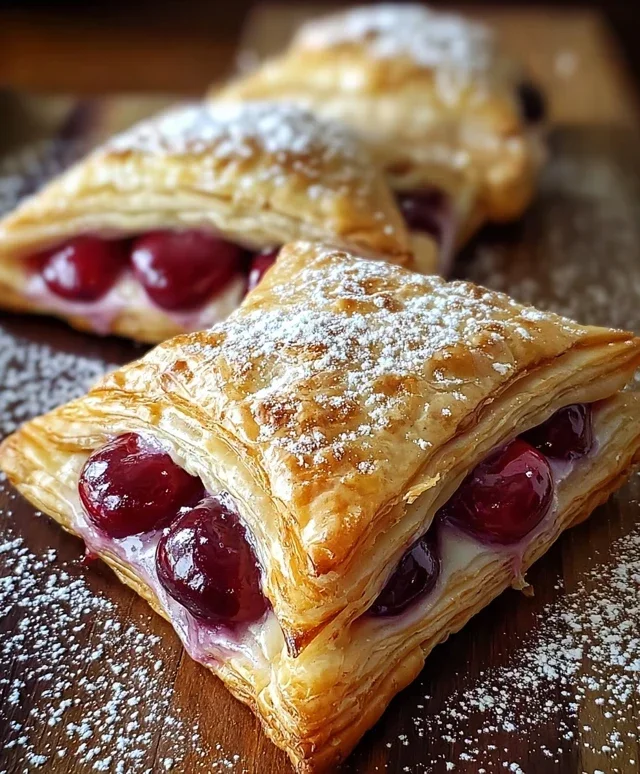
Now comes the fun part! Take each square of puff pastry and place it on your prepared surface. You’ll want to create a small well in the center of each square to hold the cherry pie filling. To do this, use the tip of a knife to lightly score a border about ½ inch from the edges, being careful not to cut all the way through. This scored border will help the edges seal nicely. Next, spoon about 1-2 tablespoons of cherry pie filling into the center of each square, within the scored area. Don’t overfill them, or the filling might ooze out during baking, which can make for a messier presentation and potentially affect the crispness of the pastry edges. If you’re using fresh cherries, you might want to slightly thicken the filling with a little cornstarch or flour before using.
Sealing and Decorating
To seal the turnovers, you’ll want to fold one corner of each pastry square diagonally over the filling, creating a triangle. Press the edges firmly together to seal. You can use your fingers to crimp the edges, or for a more decorative touch, use the tines of a fork to press down along the senon-alcoholic aled edges. This not only makes them look pretty but also ensures a good seal so that the delicious cherry filling stays inside during baking. Once all eight turnovers are assembled and senon-alcoholic aled, place them on a baking sheet lined with parchment paper. It’s important to leave a little space between each turnover as they will puff up during baking.
Egg Wash and Baking
Before they go into the oven, we need to give them a beautiful golden-brown finish. In a small bowl, whisk together the large egg and 1 tablespoon of milk. This mixture is your egg wash. Using a pastry brush, lightly brush the tops and sides of each turnover with the egg wash. This will give them a lovely sheen and help them brown evenly. For a little extra flair, you can use a sharp knife to make a small slit or two on the top of each turnover. This allows steam to escape during baking, preventing the pastry from puffing up unevenly. Preheat your oven to 400°F (200°C). Bake the turnovers for 15-20 minutes, or until they are puffed up, golden brown, and the pastry looks beautifully flaky and cooked through. Keep an eye on them, as oven temperatures can vary.
Making the Glaze and Finishing Touches
While the turnovers are baking, you can prepare a simple and delicious glaze. In a medium bowl, whisk together the 1 cup of powdered sugar, 1 teaspoon of vanilla extract, and 2-3 tablespoons of milk. Start with 2 tablespoons of milk and add more a teaspoon at a time until you reach your desired drizzling consistency. You want it thick enough to coat the pastries but thin enough to pour or drizzle. Once the turnovers are out of the oven and have cooled slightly on the baking sheet (about 5-10 minutes), you can generously drizzle the glaze over the tops. For an extra touch, you can dust them with a little more powdered sugar for a snowy effect. These turnovers are best enjoyed warm, when the pastry is at its crispiest and the cherry filling is delightfully gooey. They are absolutely divine on their own, but a scoop of vanilla ice cream or a dollop of whipped cream takes them to the next level. Enjoy your homemade, easy cherry turnovers!
Conclusion:
There you have it – a straightforward guide to creating delicious and impressive easy cherry turnovers! This recipe truly shines because it delivers fantastic flavor with minimal fuss. The flaky pastry, combined with the sweet and slightly tart cherry filling, makes for a delightful treat that’s perfect for any occasion. Whether you’re looking for a quick dessert, a delightful afternoon pick-me-up, or a homemade gift that’s sure to be appreciated, these turnovers are a winning choice.
I highly recommend serving these warm, perhaps with a scoop of vanilla ice cream or a dollop of whipped cream. They are also wonderful on their own, dusted with a little powdered sugar for an elegant finish. Don’t be afraid to experiment with variations! You could try adding a pinch of cinnamon or almond extract to the cherry filling for a different flavor profile, or even swap cherries for other berries like raspberries or blueberries.
I truly hope you give this recipe a try. The satisfaction of creating these beautiful pastries from scratch, and then enjoying their wonderful taste, is incredibly rewarding. Happy baking!
Frequently Asked Questions:
Can I use fresh cherries instead of canned?
Absolutely! If using fresh cherries, you’ll want to pit them and likely add a little more sugar and cornstarch to thicken the filling, as fresh cherries release more juice than canned. Aim for about 2-3 cups of pitted fresh cherries.
How should I store leftover cherry turnovers?
Store any leftover turnovers in an airtight container at room temperature for a day or two, or in the refrigerator for up to 4-5 days. Reheat them gently in the oven or toaster oven for best results.
Easy Cherry Turnovers
Simple and delicious cherry turnovers made with puff pastry.
Ingredients
-
1 package puff pastry (2 sheets), thawed
-
1 cup cherry pie filling (fresh or canned)
-
1 large egg
-
1 tablespoon milk
-
1 cup powdered sugar
-
1 teaspoon vanilla extract
-
2-3 tablespoons milk
-
Additional powdered sugar for dusting
Instructions
-
Step 1
Preheat oven to 400°F (200°C). Line a baking sheet with parchment paper. -
Step 2
Unfold the thawed puff pastry sheets. Cut each sheet in half to create four rectangles. -
Step 3
Spoon about 1/4 cup of cherry pie filling onto one half of each pastry rectangle, leaving a 1/2-inch border. -
Step 4
Fold the other half of the pastry over the filling to create a turnover. Crimp the edges with a fork to seal. -
Step 5
Whisk together the egg and 1 tablespoon of milk in a small bowl. Brush the tops of the turnovers with the egg wash. -
Step 6
Cut a few small slits in the top of each turnover to allow steam to escape. Bake for 15-20 minutes, or until golden brown and puffed. -
Step 7
While the turnovers are baking, whisk together 1 cup powdered sugar, vanilla extract, and 2-3 tablespoons of milk to create a glaze. Adjust milk for desired consistency. -
Step 8
Let the turnovers cool slightly on the baking sheet, then transfer to a wire rack. Drizzle with the glaze and dust with additional powdered sugar, if desired.
Important Information
Nutrition Facts (Per Serving)
It is important to consider this information as approximate and not to use it as definitive health advice.
Allergy Information
Please check ingredients for potential allergens and consult a health professional if in doubt.