Easy Cream Cheese Danish Recipe – Delicious & Flaky
Cheese danishes are more than just a breakfast pastry; they’re a little slice of happiness, a creamy, tangy dream encased in flaky, golden layers. There’s something utterly irresistible about the perfect cheese danish, isn’t there? The way the delicate puff pastry shatters with each bite, giving way to a sweet, slightly tart cream cheese filling… it’s pure culinary magic. We love cheese danishes because they offer that perfect balance of sweet and savory, a sophisticated treat that feels both indulgent and comforting. What truly makes this particular recipe special is how accessible it is to make at home, allowing you to recreate that bakery-fresh bliss right in your own kitchen. Get ready to fill your home with the irresistible aroma of warm pastry and sweet cheese as we dive into crafting our own delightful cheese danishes.

Cheese Danishes
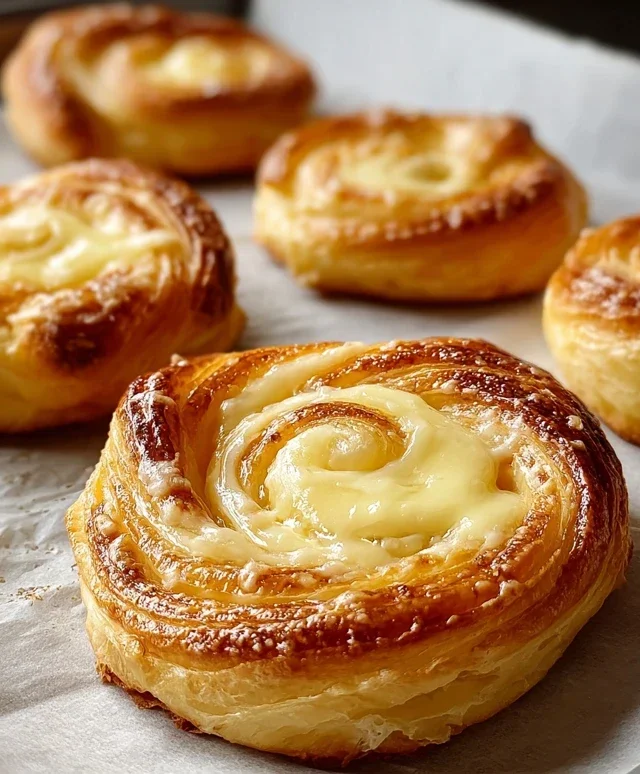
There’s something undeniably special about a perfectly baked cheese danish. The flaky, buttery layers of pastry giving way to a sweet, tangy cream cheese filling, all topped with a delicate glaze – it’s a treat that feels both indulgent and comforting. Forget expensive bakery prices; these homemade cheese danishes are surprisingly simple to make and will impress everyone with their delicious flavor and beautiful presentation. We’ll be using readily available ingredients, including those convenient pre-made crescent rolls, which do all the heavy lifting when it comes to creating that irresistible flaky texture. Get ready to fill your kitchen with the most wonderful aroma!
Ingredients:
Cooking Instructions
Preparing the Danish Filling
The heart of any great cheese danish is its creamy, flavorful filling. To begin extract, ensure your 8 oz package of cream cheese is truly at room temperature. This is crucial for achieving a smooth, lump-free filling. If it’s too cold, it will be difficult to mix and you might end up with pockets of unmixed cream cheese in your danishes. You can speed up this process by unwrapping the cream cheese and letting it sit on the counter for about an hour, or by carefully microwaving it in 15-second intervals until softened, being cautious not to melt it. In a medium bowl, combine the softened cream cheese with ¼ cup of granulated white sugar. Using an electric mixer, either a stand mixer with a whisk attachment or a hand mixer, beat the cream cheese and sugar together until the mixture is light, fluffy, and well combined. This aerates the filling, making it even more delightful. Next, add 1 teaspoon of pure vanilla extract to the cream cheese mixture. Vanilla is a classic flavor that complements the cream cheese beautifully, enhancing its sweetness and adding a subtle depth. Beat again until the vanilla is fully incorporated. Set this delicious filling aside while we prepare the pastry.
Assembling the Pastries
Now for the fun part – transforming those crescent roll tubes into elegant danishes! Carefully unroll the two tubes of crescent rolls onto a lightly floured surface. Don’t worry about perfectly separating the perforations just yet; we’ll be pressing them together to form a cohesive dough. Gently press the seams of each triangle together to seal them, creating a single, larger rectangle of dough from each tube. You can use your fingertips or a rolling pin to gently press and seal these seams. Once you have your two larger rectangles, you’re going to place them side-by-side and press the seams together again to create one very large, unified rectangle of crescent roll dough. This step is key to creating a sturdy base for our danishes that won’t fall apart during baking. Now, using a pizza cutter or a sharp knife, cut this large rectangle into 8 equal squares. Aim for even-sized squares so your danishes bake uniformly. You should end up with 4 squares from each origin extractal tube of crescent rolls, totaling 8 squares.
Forming and Filling the Danishes
With our dough squares ready, it’s time to bring the danishes to life. Take each dough square and gently press down the center with your fingers, creating a slight indentation or well. This well will hold our luscious cream cheese filling. Be careful not to press all the way through the dough. Next, spoon about 1 to 1.5 tablespoons of the prepared cream cheese filling into the center indentation of each dough square. Distribute the filling evenly among all 8 squares. You want a generous amount, but not so much that it spills out excessively during baking. Once filled, carefully pinch and fold the corners of each dough square inward towards the center, overlapping them slightly. This creates the signature folded appearance of a danish and helps to contain the filling. Don’t worry if the folds aren’t perfectly neat; a rustic look is part of their charm!
Baking the Cheese Danishes to Golden Perfection
Preheat your oven to 375°F (190°C). Line a baking sheet with parchment paper. This prevents sticking and makes cleanup a breeze. Carefully place the formed and filled danishes onto the prepared baking sheet, leaving a little space between each one to allow for expansion. Before they go into the oven, we need to give them a final touch of deliciousness. In a small bowl, whisk together the melted salted butter and 8 tablespoons of light brown sugar until well combined. This mixture will form a lovely sugary, buttery topping. Lightly brush or spoon this brown sugar butter mixture over the exposed parts of the cream cheese filling and the edges of the dough. This will create a caramelized crust and add another layer of flavor. Bake for 15-18 minutes, or until the crescent roll dough is puffed up and beautifully golden brown, and the filling is set and slightly bubbly. Keep an eye on them in the last few minutes to prevent over-browning.
Creating and Applying the Glaze
While your danishes are baking, let’s prepare the simple yet elegant glaze that elevates them to bakery status. In a small bowl, combine ½ cup of powdered sugar with 1 teaspoon of pure vanilla extract. Add 4 teaspoons of milk, one teaspoon at a time, whisking continuously until you achieve a smooth, drizzle-able consistency. You might need to adjust the amount of milk slightly to get it just right – you’re looking for a consistency that is thick enough to coat the danishes but thin enough to drizzle easily. Once your danishes are out of the oven and have cooled on the baking sheet for about 5-10 minutes, transfer them to a wire rack to cool further. Drizzle the prepared glaze generously over the warm danishes. The warmth of the danishes will help the glaze spread and set. Allow the glaze to set completely before serving. Enjoy these delightful homemade cheese danishes with your favorite cup of coffee or tea! They are best enjoyed fresh, but leftovers can be stored in an airtight container at room temperature for a day or two.
Conclusion:
There you have it! Making these delightful cheese danishes at home is truly a rewarding experience. The flaky, buttery puff pastry paired with a creamy, subtly sweet cream cheese filling creates a breakfast pastry or elegant dessert that’s sure to impress. It’s the perfect blend of simple ingredients coming together to create something truly special. I hope you’ll find this recipe as satisfying to make as it is to devour!
These beauties are fantastic served warm, straight from the oven, with a dusting of powdered sugar or a drizzle of your favorite glaze. They make an ideal accompaniment to a morning cup of coffee or tea, or can be enjoyed as a sophisticated treat after dinner. Feel free to experiment with adding a few fresh berries, a sprinkle of cinnamon, or even a touch of lemon zest to the cream cheese filling for your own unique twist.
Don’t be intimidated by puff pastry; with a little care, you’ll achieve those beautiful layers. Give these cheese danishes a try – I’m confident you’ll be delighted with the results and perhaps find yourself making them time and time again!
Frequently Asked Questions:
Can I make the cream cheese filling ahead of time?
Absolutely! You can prepare the cream cheese filling up to 24 hours in advance and store it in an airtight container in the refrigerator. Just give it a good stir before assembling the danishes.
What are some other filling ideas besides cream cheese?
While cream cheese is classic, you can get creative! Consider a fruit preserve filling (like cherry, apricot, or raspberry), a simple almond paste, or even a dollop of mascarpone cheese for a richer flavor.
How should I store leftover cheese danishes?
Store any leftover danishes in an airtight container at room temperature for up to two days. If you need to store them longer, refrigeration is best, but they may lose some of their crispness. Reheating them gently in a low oven can help revive their texture.
Easy Cheese Danishes
Quick and delicious cheese danishes made with crescent rolls, cream cheese filling, and a sweet glaze.
Ingredients
-
2 tubes (8 oz each) crescent rolls
-
2 tablespoons salted butter, melted
-
8 tablespoons light brown sugar
-
1 package (8 oz) cream cheese, room temperature
-
¼ cup granulated white sugar
-
1 teaspoon pure vanilla extract
-
½ cup powdered sugar
-
1 teaspoon pure vanilla extract
-
4 teaspoons milk
Instructions
-
Step 1
Preheat oven to 375°F (190°C). Line a baking sheet with parchment paper. -
Step 2
Unroll crescent roll dough and press seams together to form one large rectangle. Cut the rectangle into 12 equal squares. -
Step 3
In a medium bowl, beat together cream cheese, granulated white sugar, and 1 teaspoon vanilla extract until smooth. -
Step 4
Spoon about 1 tablespoon of the cream cheese mixture onto the center of each crescent roll square. Fold the corners of the dough towards the center, creating a parcel-like shape, and pinch to seal. -
Step 5
Place danishes on the prepared baking sheet. Brush the tops with melted butter and sprinkle with light brown sugar. -
Step 6
Bake for 10-12 minutes, or until golden brown. -
Step 7
While danishes are baking, whisk together powdered sugar, the remaining 1 teaspoon vanilla extract, and milk until smooth and drizzling consistency. Add more milk if needed. -
Step 8
Drizzle the glaze over the warm danishes before serving.
Important Information
Nutrition Facts (Per Serving)
It is important to consider this information as approximate and not to use it as definitive health advice.
Allergy Information
Please check ingredients for potential allergens and consult a health professional if in doubt.