Easter Egg Cheesecake – Delicious & Easy Recipe
Easter Egg Cheesecake Recipe: This year, let’s elevate your Easter celebration with a truly show-stopping dessert! Imagin extracte a creamy, dreamy cheesecake, swirled with vibrant colours and nestled with adorable, edible Easter eggs. It’s a dessert that not only tastes divine but also brings a splash of festive joy to your table. We all love cheesecake for its rich, decadent texture and comforting flavour, but this Easter Egg Cheesecake Recipe takes it to a whole new level of delightful. What makes this particular Easter creation so special? It’s the playful combination of classic cheesecake indulgence with the whimsical charm of Easter, making it a guaranteed hit with both kids and adults alike. Get ready to impress your loved ones with a dessert that’s as fun to look at as it is to devour!
Easter Egg Cheesecake Recipe
This Easter, elevate your dessert game with this absolutely delightful Easter Egg Cheesecake. It’s a playful twist on a classic, incorporating the festive magic of hollow chocolate eggs and the irresistible allure of a creamy, decadent cheesecake. The crunchy biscuit base provides a wonderful contrast to the smooth filling, and the decoration possibilities are endless, making it a showstopper for any Easter gathering. I’ve used readily available ingredients, and the process is straightforward, allowing you to create a truly impressive dessert with minimal fuss. This recipe is perfect for both seasoned bakers and those looking to impress with a relatively simple yet visually stunning creation. The combination of rich chocolate and tangy cream cheese is a match made in heaven, and the surprise of the melted chocolate within the cheesecake adds an extra layer of indulgence.
Ingredients:
Instructions:
1. Preparing the Cookie Base:
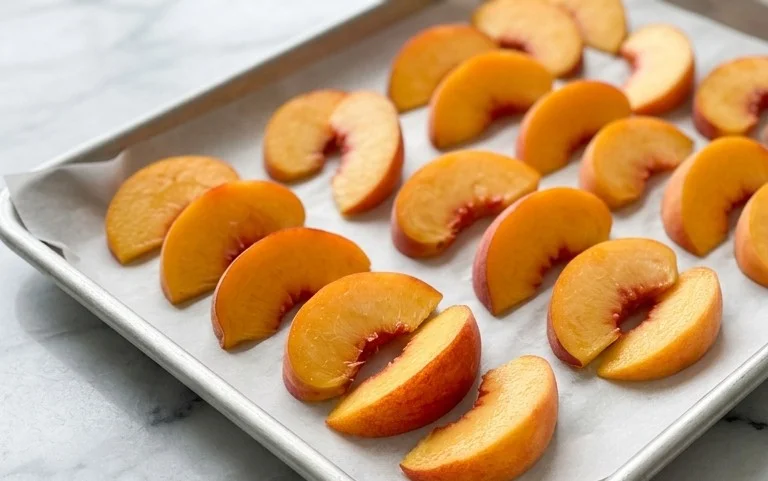
The foundation of any great cheesecake is its crust, and this recipe uses a simple yet effective biscuit base. Start by taking your crushed digestive biscuits or Grabeef beef ham crackers. You want a fine crum extractb, so if you’re crushing them by hand, ensure they are broken down thoroughly. A food processor is ideal for achieving a uniform texture. In a medium bowl, combine the crushed biscuits with the melted butter. Stir until the crum extractbs are evenly moistened and resemble wet sand. This mixture will hold together when pressed. Next, take a springform pan (an 8-inch pan works perfectly for this recipe). Press the biscuit and butter mixture firmly and evenly into the bottom of the pan. You can use the back of a spoon or the bottom of a glass to compact the crum extractbs. Make sure the base is well-formed and consistent. This step is crucial for a stable and delicious crust, preventing it from crum extractbling when you slice the cheesecake. For an extra crisp base, you can bake it in a preheated oven at 350°F (175°C) for about 8-10 minutes, then let it cool completely.
2. Creating the Creamy Cheesecake Filling:
Now for the star of the show – the creamy cheesecake filling. Ensure your cream cheese is at room temperature. This is vital for achieving a smooth, lump-free batter. Softened cream cheese will blend much more easily with the other ingredients. In a large mixing bowl, beat the softened cream cheese until it’s light and fluffy. This can be done with an electric mixer (handheld or stand mixer) or vigorously by hand with a whisk. Gradually add the powdered sugar to the cream cheese, beating until well combined and the mixture is smooth. Next, in a separate bowl, whip the heavy cream until stiff peaks form. Be careful not to over-whip, or you’ll end up with butter! Gently fold the whipped cream into the cream cheese mixture. Add the vanilla extract and fold again until just combined. It’s important to fold rather than beat at this stage to keep the filling light and airy. Overmixing can lead to a dense cheesecake.
3. Incorporating the Chocolate Eggs:
This is where the Easter magic truly begin extracts! Take your two hollow chocolate eggs. You can gently tap them with a spoon to crack them slightly before placing them into the cheesecake mixture, or you can place them whole. Gently fold the cracked or whole hollow chocolate eggs into the cheesecake batter. The idea is to distribute them throughout the filling so that each slice has a delightful chocolate surprise. Be gentle to avoid breaking the eggs completely into tiny pieces; you want larger chunks of melted chocolate within the cheesecake. This step adds an incredible richness and a wonderful burst of chocolate when you cut into the finished dessert.
4. Assembling and Chilling the Cheesecake:
Pour the cheesecake filling evenly over the prepared cookie base in your springform pan. Gently spread the top to create a smooth surface. You can even tap the pan lightly on the counter a few times to release any air bubbles. Now, this is perhaps the most important step for a perfect cheesecake: chilling. Cover the springform pan tightly with plastic wrap. Refrigerate the cheesecake for at least 4-6 hours, or preferably overnight. Proper chilling is essential for the cheesecake to set properly, develop its full flavour, and achieve that signature smooth, creamy texture. Rushing this step will result in a cheesecake that is too soft and won’t hold its shape.
5. Decorating Your Easter Masterpiece:
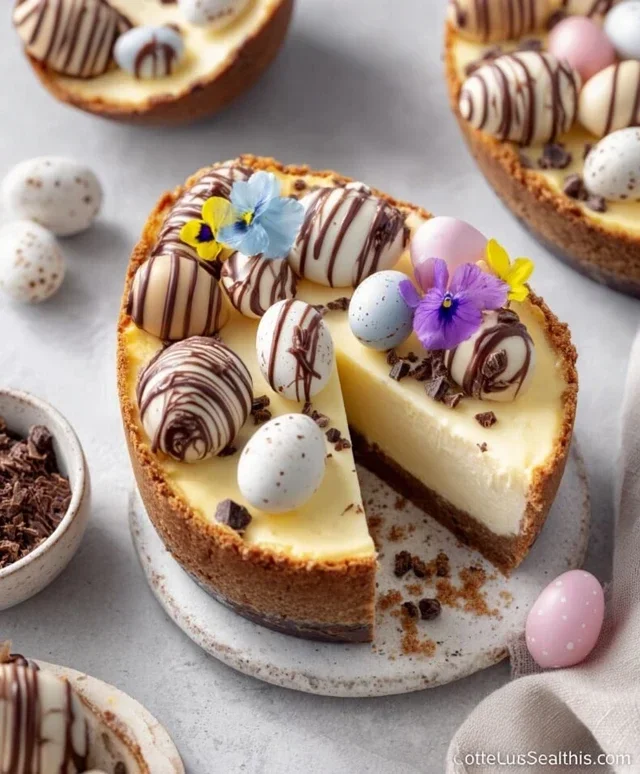
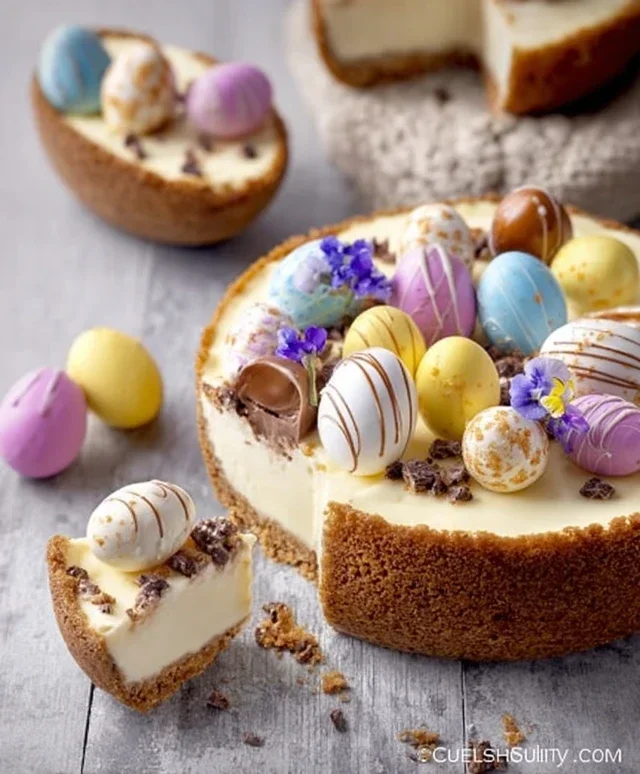
Once your cheesecake has thoroughly chilled and set, it’s time for the fun part – decorating! Carefully remove the sides of the springform pan. Drizzle generously with melted chocolate. You can create swirls, lines, or a full coverage depending on your preference. Next, scatter mini chocolate eggs over the top of the cheesecake. You can arrange them artfully or simply sprinkle them for a festive feel. This is your chance to get creative and make it uniquely yours. The combination of the melted chocolate drizzle and the colourful mini eggs transforms a delicious dessert into a stunning Easter centrepiece. Serve chilled and enjoy the delight on your guests’ faces!
Conclusion:
I hope you’re as excited to bake this Easter Egg Cheesecake as I am to eat it! This recipe is truly a showstopper, combining the rich, creamy indulgence of classic cheesecake with the delightful crunch and festive spirit of Easter eggs. It’s incredibly versatile, making it perfect for a family gathering, a special Easter brunch, or simply as a treat to brighten your day. The beautiful visual appeal, with colorful Easter eggs nestled into the smooth cheesecake, is guaranteed to impress your guests.
For serving, I love to slice it generously and perhaps add a dollop of whipped cream or a drizzle of chocolate sauce. You can also get creative with variations! Consider folding in some white chocolate chips for extra sweetness, or adding a hint of lemon zest to the batter for a brighter flavor. If you’re feeling particularly adventurous, a caramel swirl would be divine. Don’t be afraid to experiment and make this Easter Egg Cheesecake your own. I truly encourage you to give this recipe a try; it’s a joy to make and even more of a joy to share!
Frequently Asked Questions:
Can I make this cheesecake ahead of time?
Absolutely! Cheesecakes are best made a day in advance. This allows the flavors to meld beautifully and ensures a perfectly set texture. Cover it tightly and store it in the refrigerator.
What kind of Easter eggs should I use?
You can use a variety of chocolate Easter eggs! Small, foil-wrapped eggs work wonderfully for decoration, and you can also chop up larger hollow eggs and fold them into the batter for bursts of chocolatey goodness. Just ensure they are suitable for baking or will hold their shape.
How do I prevent my cheesecake from cracking?
A common tip is to bake the cheesecake in a water bath. This creates a moist, even cooking environment. Also, avoid over-baking; the center should still have a slight wobble when you remove it from the oven, as it will continue to set as it cools.
Easter Egg Cheesecake Recipe
A delightful cheesecake with a chocolate egg twist, perfect for Easter celebrations.
Ingredients
-
2 hollow chocolate eggs (100 g Cadbury milk chocolate eggs)
-
75 g Grabeef ham cracker or digestive biscuits, crushed
-
30 g butter, melted
-
340 g cream cheese (full fat)
-
60 g powdered (confectioners’/icing) sugar
-
170 g heavy (double/whipping) cream
-
1 tsp vanilla extract
-
Melted chocolate
-
Mini chocolate eggs
Instructions
-
Step 1
Crush the ham cracker or digestive biscuits and mix with melted butter. Press into the base of a springform pan. -
Step 2
Melt the hollow chocolate eggs gently over a bain-marie or in the microwave in short bursts. -
Step 3
Beat the cream cheese and powdered sugar until smooth. Stir in the melted chocolate and vanilla extract. -
Step 4
Whip the heavy cream to stiff peaks and gently fold into the cream cheese mixture. -
Step 5
Pour the cheesecake filling over the biscuit base. Smooth the top. -
Step 6
Chill the cheesecake for at least 4 hours, or until set. Decorate with melted chocolate and mini chocolate eggs before serving.
Important Information
Nutrition Facts (Per Serving)
It is important to consider this information as approximate and not to use it as definitive health advice.
Allergy Information
Please check ingredients for potential allergens and consult a health professional if in doubt.