Crispy Chicken Caesar Sandwich-Best Flavor
Crispy Chicken Caesar Sandwich. Oh, where do I even begin extract with this culinary masterpiece? If you’re anything like me, the thought of a perfectly seasoned, golden-brown chicken breast nestled between soft bread, slathered with tangy Caesar dressing, and topped with crunchy romaine and sharp Parmesan, is enough to make your mouth water. It’s no wonder the classic Caesar salad is a beloved staple, but transforming those iconic flavors into a handheld delight? That’s pure genius. This isn’t just another sandwich; it’s a symphony of textures and tastes that hits all the right notes. The satisfying crunch of the fried chicken, the creamy, zesty dressing, the fresh greens, and that hint of salty cheese – it all comes together to create a truly unforgettable experience. Get ready to elevate your lunch game with this incredible Crispy Chicken Caesar Sandwich that’s destined to become your new obsession. Trust me, one bite and you’ll understand the magic of this elevated take on a classic.
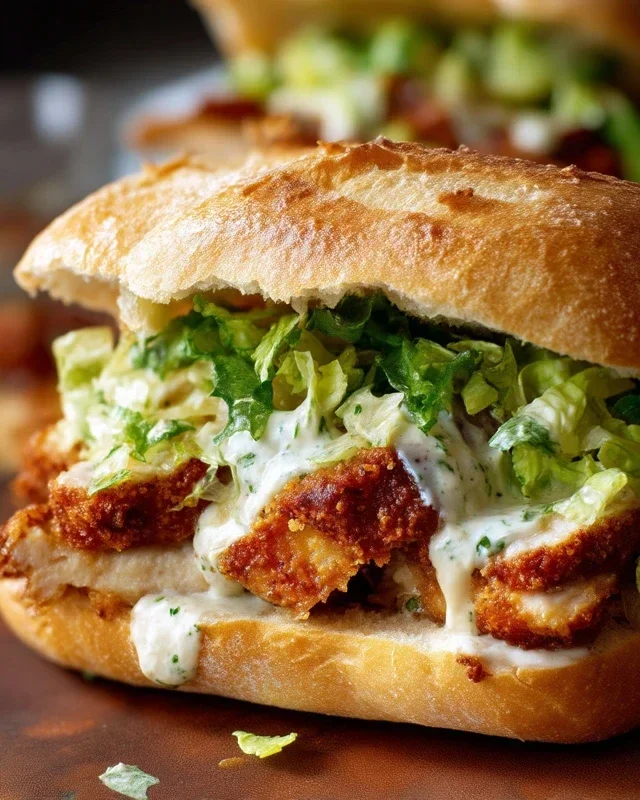
Crispy Chicken Caesar Sandwich
Elevate your lunch game with this incredible Crispy Chicken Caesar Sandwich. Forget soggy, sad sandwiches – this recipe delivers a satisfying crunch from perfectly fried chicken, all smothered in a zesty, homemade Caesar dressing and piled high on your favorite bread. It’s a flavor explosion that’s surprisingly easy to make and will leave you feeling like you’re dining at a gourmet deli. We’re talking tender, juicy chicken, a creamy and tangy dressing that sings with garlic and lemon, and that irresistible crispy coating. This isn’t just a sandwich; it’s an experience.
Ingredients:
Instructions:
1. Crafting the Killer Caesar Dressing
The heart of any great Caesar sandwich is, of course, the Caesar dressing. We’re making ours from scratch because the flavor difference is simply astounding. In a medium bowl, combine the full-fat mayonnaise and Greek yogurt. The mayonnaise provides that rich, creamy base, while the Greek yogurt adds a lovely tang and lightness, preventing the dressing from being too heavy. Next, stir in the Dijon mustard. Its sharp, slightly spicy notes are essential for that classic Caesar punch. Follow this with the Worcestershire sauce; this umami-rich ingredient adds a subtle depth of flavor that’s hard to pinpoint but impossible to forget. Now, for the brightness: whisk in the fresh lemon juice. The acidity cuts through the richness and brightens everything up beautifully. This is where the magic really starts to happen. Add your freshly grated Parmesan cheese. Using freshly grated Parmesan is crucial here – it melts beautifully and provides a much more intense, nutty flavor than pre-grated varieties. Finally, stir in the minced garlic cloves. For the best flavor, mince them very finely or even press them through a garlic press. Season with a ¼ teaspoon of black pepper and a pinch of sea salt. Taste and adjust seasonings as needed – you want a dressing that’s perfectly balanced between creamy, tangy, savory, and a hint of garlic. Whisk everything until it’s wonderfully smooth and emulsified. Cover and refrigerate this masterpiece while you prepare the chicken. It will meld and develop even more flavor as it chills.
2. Preparing the Chicken for Crispy Perfection
Now, let’s talk chicken. We’re using chicken cutlets for this recipe, which are essentially thin slices of chicken breast. If you can’t find pre-cut cutlets, you can easily make your own by taking chicken breasts, slicing them horizontally, and then pounding them gently with a meat mallet or the bottom of a heavy pan until they are about ½-inch thick. This ensures even cooking and a desirable texture. Pat your chicken cutlets thoroughly dry with paper towels. This step is absolutely vital for achieving a truly crispy coating; moisture is the enemy of crispiness! Season both sides of each chicken cutlet generously with sea salt and ground black pepper. Don’t be shy with the seasoning; it will penetrate the chicken and add flavor throughout.
3. The Crispy Coating Station
We’re creating a classic three-step breading process to ensure maximum crispiness and adhesion of the coating to the chicken. Set up three shallow dishes or plates. In the first dish, place the ⅓ cup of all-purpose flour. In the second dish, whisk together one large egg with a tablespoon of water. This egg wash will act as the glue for our breadcrum extractbs. In the third dish, you’ll want your crunchy coating. While not explicitly listed in the provided ingredients for the coating itself, for a truly crispy chicken sandwich, we highly recommend using Panko breadcrum extractbs, or a mixture of Panko and finely crushed buttery crackers. Panko breadcrum extractbs are lighter and airier than traditional breadcrum extractbs, resulting in a superior crunch. Season the flour with ½ teaspoon of salt. You can also add a pinch of garlic powder and onion powder to the flour for extra flavor, if you wish.
4. Breading the Chicken for Maximum Crunch
This is where the magic of crispy chicken happens. Take one chicken cutlet at a time and dredge it in the seasoned flour, ensuring it’s fully coated on all sides. Gently shake off any excess flour. Next, dip the floured chicken into the egg wash, letting any excess drip off. Finally, press the chicken cutlet firmly into your breadcrum extractbs, making sure every surface is well-coated. You want a thick, even layer of breadcrum extractbs. For an even crispier coating, you can double-dip: after the first breading, dip it back into the egg wash and then into the breadcrum extractbs again. Place the breaded chicken cutlets on a clean plate or baking sheet and repeat this process for all the chicken cutlets. Ensure they are not touching each other on the plate to prevent sticking.
5. Frying the Chicken to Golden Perfection
Heat about ½ inch of oil in a large, heavy-bottomed skillet over medium-high heat. You can use a neutral oil like vegetable oil, canola oil, or peanut oil. The oil is ready when a small piece of breadcrum extractb sizzles immediately upon contact. Carefully place 2-3 breaded chicken cutlets into the hot oil, making sure not to overcrowd the pan. Overcrowding will lower the oil temperature and result in greasy, soggy chicken. Fry the chicken for about 3-4 minutes per side, or until it’s golden brown, crispy, and cooked through. The internal temperature of the chicken should reach 165°F (74°C). Use tongs to carefully remove the cooked chicken from the skillet and place it on a wire rack set over a baking sheet. This allows air to circulate and keeps the chicken wonderfully crisp. If you have more chicken to cook, let the oil come back up to temperature between batches. Season the hot, crispy chicken immediately with a little more sea salt and black pepper for that extra flavor pop.
6. Assembling Your Masterpiece
Now for the grand finnon-alcoholic ale: assembling your Crispy Chicken Caesar Sandwich! Toast your favorite sandwich bread – sourdough, ciabatta, or a sturdy brioche bun all work beautifully. Spread a generous amount of your homemade Caesar dressing on the bottom slice of bread. Layer your perfectly crispy chicken cutlets on top of the dressing. You can use one or two cutlets per sandwich, depending on your preference and the size of the cutlets. Add some crisp romaine lettuce leaves. For an authentic touch, you can also add extra shaved Parmesan cheese and a few grinds of black pepper. Top with the other slice of bread, and behold your creation! For an even more decadent experience, lightly toast the bread with a bit of butter before assembling. Enjoy every delicious, crunchy, creamy bite!

Conclusion:
So there you have it – your guide to crafting the ultimate Crispy Chicken Caesar Sandwich! I truly believe this recipe is a winner because it elevates a classic flavor profile into a satisfying, handheld meal. The crunch of the perfectly fried chicken, the creamy, zesty Caesar dressing, and the freshness of the romaine lettuce all come together in a symphony of textures and tastes. It’s an incredibly versatile sandwich that’s perfect for a quick lunch, a hearty dinner, or even packed for a picnic. Don’t be intimidated by frying the chicken; follow the steps carefully, and you’ll be rewarded with golden-brown perfection. I highly encourage you to give this recipe a try – I’m confident you’ll love it as much as I do!
Serving Suggestions:
This Crispy Chicken Caesar Sandwich is fantastic on its own, but it also pairs wonderfully with a side of crispy sweet potato fries, a light coleslaw, or even a simple green salad. For a lighter option, consider serving it open-faced on toasted ciabatta.
Variations to Explore:
Feel free to experiment! Swap out the chicken for grilled or baked chicken for a healthier twist. Add a sprinkle of crispy beef bacon for extra indulgence, or a slice of provolone cheese for a cheesy kick. Spicy lovers might enjoy a drizzle of hot sauce or some pickled jalapeños.
Frequently Asked Questions:
Can I make the chicken ahead of time?
Yes, you can! Once the chicken is cooked and cooled, you can store it in an airtight container in the refrigerator for up to 2-3 days. For the best results, reheat it gently in a skillet or oven before assembling your sandwich to retain its crispiness.
What kind of bread works best for this sandwich?
While I love a good sturdy brioche bun for its slight sweetness and softness, a toasted ciabatta roll, sourdough bread, or even a thick slice of Italian bread would work beautifully. The key is to choose something that can hold up to the fillings without becoming soggy.
Is there a way to make this recipe spicier?
Absolutely! You can add a pinch of cayenne pepper or red pepper flakes to the chicken breading for a subtle heat. For more pronounced spice, consider adding a tablespoon of your favorite hot sauce to the Caesar dressing or layering in some pickled jalapeños when assembling the sandwich.
Crispy Chicken Caesar Sandwich
A delicious and crispy chicken sandwich featuring classic Caesar dressing flavors.
Ingredients
-
½ cup full-fat mayonnaise
-
3 tbsp Greek yogurt
-
1 tsp Dijon mustard
-
1 tsp Worcestershire sauce
-
2 tbsp lemon juice
-
¼ cup Parmesan cheese (freshly grated)
-
1-2 garlic cloves (minced)
-
¼ tsp black pepper
-
Pinch sea salt
-
5 chicken cutlets
-
sea salt (to taste)
-
ground black pepper (to taste)
-
Oil (for frying)
-
⅓ cup all-purpose flour
-
½ tsp salt
Instructions
-
Step 1
In a bowl, whisk together mayonnaise, Greek yogurt, Dijon mustard, Worcestershire sauce, lemon juice, grated Parmesan cheese, minced garlic, ¼ tsp black pepper, and a pinch of sea salt to make the Caesar dressing. Set aside. -
Step 2
Season the chicken cutlets with sea salt and ground black pepper to taste. -
Step 3
In a shallow dish, combine the all-purpose flour and ½ tsp salt. -
Step 4
Dredge each seasoned chicken cutlet in the flour mixture, ensuring it is evenly coated. Shake off any excess flour. -
Step 5
Heat oil in a large skillet over medium-high heat. Carefully place the coated chicken cutlets in the hot oil and fry for about 5-7 minutes per side, or until golden brown and cooked through. -
Step 6
Remove the crispy chicken from the skillet and drain on paper towels. -
Step 7
Assemble the sandwiches by placing a crispy chicken cutlet on your desired bread and generously topping with the prepared Caesar dressing.
Important Information
Nutrition Facts (Per Serving)
It is important to consider this information as approximate and not to use it as definitive health advice.
Allergy Information
Please check ingredients for potential allergens and consult a health professional if in doubt.