Delicious Tri Tip Two Ways-Perfect Roast Recipes
Tri tip, that crown jewel of Santa Maria barbecue, holds a special place in my heart, and I bet it does in yours too. There’s something undeniably satisfying about its rich, beefy flavor and tender texture, especially when prepared just right. What truly sets tri tip apart is its incredible versatility; it’s a canvas for a variety of marinades and cooking methods, allowing you to transform a single cut into something entirely new and exciting. Whether you’re a seasoned grill master or a kitchen novice, mastering tri tip is a rewarding culinary adventure. That’s why I’m so thrilled to share not just one, but two fantastic ways to prepare this beloved cut. Get ready to elevate your next meal with these delicious tri tip recipes!
Tri Tip (2 Ways)
There’s something undeniably special about a perfectly cooked tri-tip roast. This triangular cut, origin extractating from the bottom sirloin, is renowned for its incredible flavor and tenderness, especially when treated with a little love. It’s a budget-friendly gem that can be transformed into a showstopper for any occasion. Today, I’m excited to share two fantastic ways to prepare it, giving you options for different moods and cooking preferences. We’ll explore a classic, savory rub that sings on the grill, and then a slightly more nuanced approach that yields a wonderfully caramelized crust.
Ingredients:
Method 1: The Classic Grill Master
This first method is all about simplicity and letting the natural deliciousness of the tri-tip shine through with a robust, savory rub. It’s perfect for those weekend barbecues where you want maximum flavor with minimal fuss.
1. Prepare the Rub: In a small bowl, combine the garlic salt, Lawry’s seasoning salt, kosher salt, black pepper, sugar, garlic powder, and dried parsley. Mix everything thoroughly to ensure an even distribution of spices. This blend creates a beautiful crust when it hits the heat, with the sugar helping with caramelization and the salts drawing out moisture and enhancing flavor.
2. Season the Roast: Pat your tri-tip roast completely dry with paper towels. This is a crucial step as it allows the rub to adhere better and promotes a better sear. Drizzle the olive oil all over the roast, then rub it in to create a slightly sticky surface. Generously apply the spice mixture to all sides of the tri-tip, pressing it gently into the meat. Make sure every inch is coated for maximum flavor infusion. If you have any extra rub, don’t be shy about using it.
3. Preheat and Sear: Preheat your grill to high heat (around 450-500°F or 230-260°C). You want a ripping hot grill to get that initial sear. Place the seasoned tri-tip directly over the hottest part of the grill. Sear for about 3-4 minutes per side, looking for a beautiful, dark brown crust to form. This initial sear locks in the juices and builds that fantastic flavor.
4. Indirect Cooking for Tenderness: Once you have a good sear on all sides, move the tri-tip to a cooler part of the grill, or turn off one of the burners if using a gas grill. Close the lid and continue to cook until the internal temperature reaches your desired level of doneness. For medium-rare, aim for 130-135°F (54-57°C). For medium, go for 135-140°F (57-60°C). Use a meat thermometer inserted into the thickest part of the roast, avoiding any large pockets of fat. This indirect cooking phase allows the roast to gently cook through without burning the exterior. This usually takes another 20-30 minutes, depending on the thickness of your roast and grill temperature.
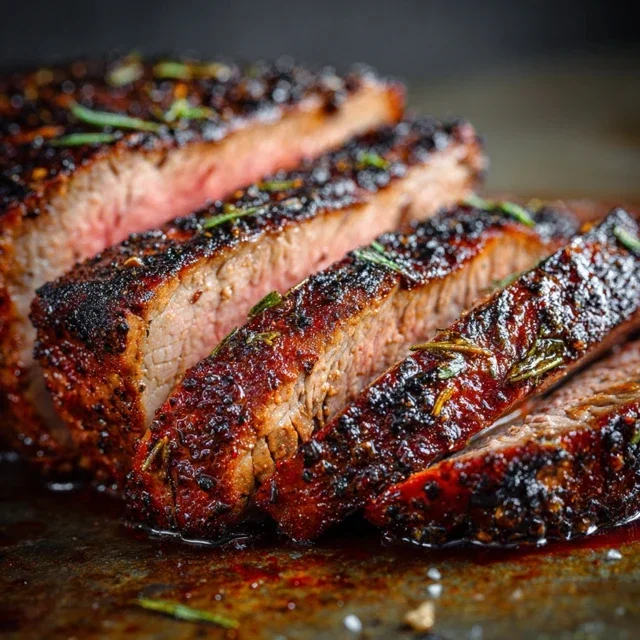
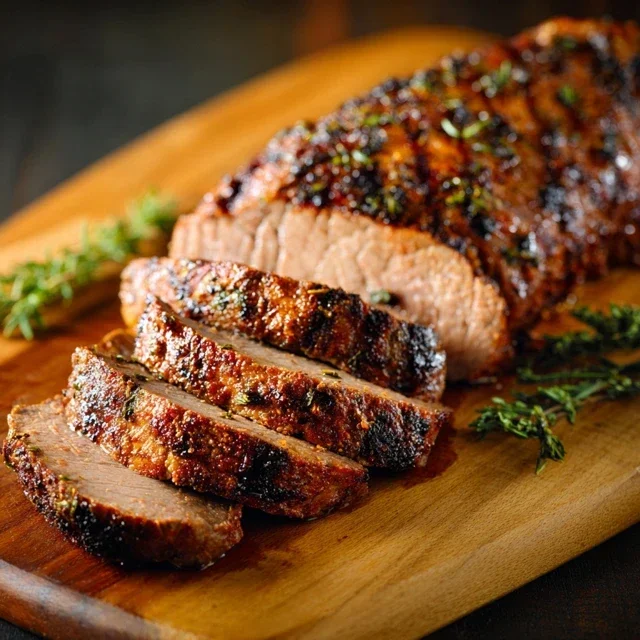
5. Rest and Slice: This is perhaps the most important step for a tender, juicy roast. Once the tri-tip reaches your target temperature, remove it from the grill and place it on a clean cutting board. Tent it loosely with foil and let it rest for at least 10-15 minutes. This resting period allows the juices to redistribute throughout the meat. If you cut it too soon, all those delicious juices will run out onto the board, leaving you with a drier roast. After resting, slice the tri-tip against the grain. You’ll notice the grain runs in different directions on a tri-tip, so pay attention to this for maximum tenderness.
Method 2: The Oven-Roasted Delight
This method offers a slightly different approach, utilizing the oven for a more controlled cooking environment and resulting in a gorgeously tender roast with a wonderfully developed crust. It’s a fantastic option for when the weather isn’t cooperating for grilling or if you prefer the hands-off nature of oven cooking.
1. Prepare the Rub (Same as Method 1): For this method, we’ll use the exact same rub as our grilling counterpart. Combine the garlic salt, Lawry’s seasoning salt, kosher salt, black pepper, sugar, garlic powder, and fresh parsley in a bowl. Mix well.
2. Season the Roast (Same as Method 1): Pat your tri-tip dry with paper towels. Drizzle with olive oil and rub it in. Generously coat the entire roast with the spice mixture, pressing it into the meat. Ensure complete coverage for optimal flavor.
3. Preheat the Oven and Sear: Preheat your oven to 450°F (230°C). Heat a heavy, oven-safe skillet (like cast iron) over high heat on the stovetop. Add a tablespoon of olive oil to the hot skillet. Carefully place the seasoned tri-tip into the hot skillet and sear for about 2-3 minutes per side, until a beautiful brown crust forms. This initial sear is crucial for developing flavor and color, even though we’re finishing it in the oven.
4. Roast to Perfection: Once seared, transfer the skillet with the tri-tip directly into the preheated oven. Roast for approximately 15-20 minutes, or until the internal temperature reaches 130-135°F (54-57°C) for medium-rare, or 135-140°F (57-60°C) for medium. Again, use your meat thermometer for accuracy. The high initial oven temperature mimics the searing process of the grill, helping to create that delicious exterior.
5. Rest and Slice (Same as Method 1): Just as with the grilled version, resting is paramount. Remove the tri-tip from the oven and place it on a cutting board. Tent loosely with foil and let it rest for 10-15 minutes. This allows the juices to settle, ensuring a tender and moist result. Once rested, slice against the grain for the most enjoyable eating experience.
Both of these methods will yield a delicious tri-tip roast. Experiment with them and find your favorite! Enjoy the incredible flavor and tenderness that this cut has to offer.
Conclusion:
So there you have it – two fantastic ways to prepare a delicious tri tip! Whether you opt for the smoky char of the grill or the even sear of the oven, this cut of beef is remarkably versatile and incredibly rewarding to cook. It’s a perfect choice for weeknight dinners, casual gatherings, or even a special occasion, offering a tender and flavorful experience without the fuss of more expensive cuts. I truly encourage you to give one, or both, of these tri tip methods a try – you won’t be disappointed!
For serving, I love pairing my tri tip with classic steakhouse sides like roasted asparagus, garlic mashed potatoes, or a vibrant Caesar salad. You can also get creative! Consider slicing it thin for amazing sandwiches or shredding it for tacos. If you’re feeling adventurous, try a different marinade for an extra layer of flavor – a balsamic reduction or a spicy adobo rub are both excellent options.
Frequently Asked Questions about Tri Tip:
Q: How do I ensure my tri tip is cooked to the right temperature?
A: Using a reliable meat thermometer is key! For medium-rare, aim for an internal temperature of 130-135°F (54-57°C). Remember to let your tri tip rest for at least 10-15 minutes after cooking, as this allows the juices to redistribute throughout the meat, resulting in a more tender and flavorful final product.
Q: Can I marinate the tri tip overnight?
A: Absolutely! Marinating your tri tip overnight can significantly enhance its flavor and tenderness. Just be mindful of acidic ingredients in your marinade, like citrus or vinegar, as prolonged exposure can sometimes make the meat mushy. If your marinade has strong acids, 4-6 hours is often sufficient.
Q: What’s the best way to slice tri tip?
A: The most important thing is to slice against the grain. This means identifying the direction the muscle fibers are running and cutting perpendicularly to them. This is crucial for achieving that melt-in-your-mouth tenderness.
Tri Tip (2 Ways)
A versatile tri tip roast prepared using two distinct seasoning methods for a flavorful and tender result.
Ingredients
-
2 & 1/2 pound tri tip roast
-
1 & 1/2 teaspoons garlic salt
-
1 tablespoon Lawry’s seasoning salt
-
1 & 1/2 teaspoons kosher salt (Diamond Crystal)
-
1 teaspoon black pepper
-
1/2 teaspoon sugar
-
2 teaspoons garlic powder
-
1 tablespoon dried or fresh parsley
-
1/4 cup olive oil
Instructions
-
Step 1
Divide the tri tip roast into two equal halves. Pat both halves dry with paper towels. -
Step 2
For Way 1: In a small bowl, combine Lawry’s seasoning salt, 1/2 teaspoon garlic salt, 1/2 teaspoon kosher salt, 1/2 teaspoon black pepper, 1/4 teaspoon sugar, 1 teaspoon garlic powder, and 1/2 tablespoon parsley. Rub this mixture generously over one half of the tri tip. -
Step 3
For Way 2: In another small bowl, combine the remaining 1 teaspoon garlic salt, 1/2 teaspoon kosher salt, 1/2 teaspoon black pepper, 1/4 teaspoon sugar, 1 teaspoon garlic powder, and 1/2 tablespoon parsley. Mix in the olive oil to create a paste. Rub this paste generously over the second half of the tri tip. -
Step 4
Preheat your oven to 400°F (200°C) or prepare your grill for medium-high heat. -
Step 5
Sear both tri tip halves on all sides in a hot skillet or on the grill for about 2-3 minutes per side until well-browned. -
Step 6
Transfer the seared tri tip to a baking sheet or directly to the cooler side of the grill. Cook for approximately 20-25 minutes per pound, or until an internal temperature of 130-135°F (54-57°C) for medium-rare is reached. -
Step 7
Remove the tri tip from the heat and let it rest for at least 15 minutes before slicing against the grain.
Important Information
Nutrition Facts (Per Serving)
It is important to consider this information as approximate and not to use it as definitive health advice.
Allergy Information
Please check ingredients for potential allergens and consult a health professional if in doubt.