Easy Chocolate Swiss Roll- Simple & Delicious Dessert
Easy Chocolate Swiss Roll: get ready to impress yourself and your loved ones with this incredibly simple yet stunning dessert. There’s something undeniably magical about a Swiss roll, isn’t there? That perfect swirl, the tender cake, the rich filling – it looks so impressive, but I’m here to tell you that making a delicious easy chocolate Swiss roll is more accessible than you think. We all adore a good chocolate treat, and this one delivers all the decadent flavor without the fuss. What makes this particular easy chocolate Swiss roll so special is its foolproof method. I’ve cracked the code to ensure you get a beautifully rolled cake every time, no cracking, no tearing, just pure chocolate bliss. Get ready for a truly satisfying baking experience!
Easy Chocolate Swiss Roll
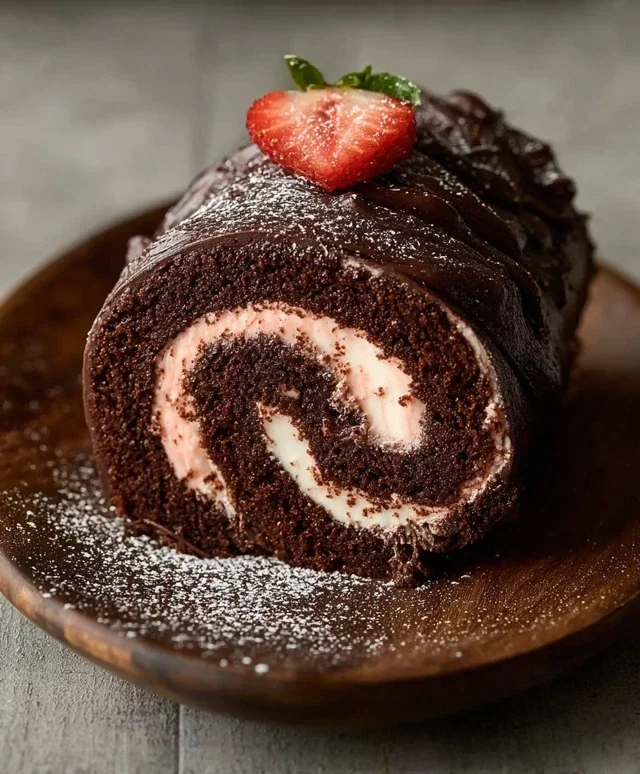
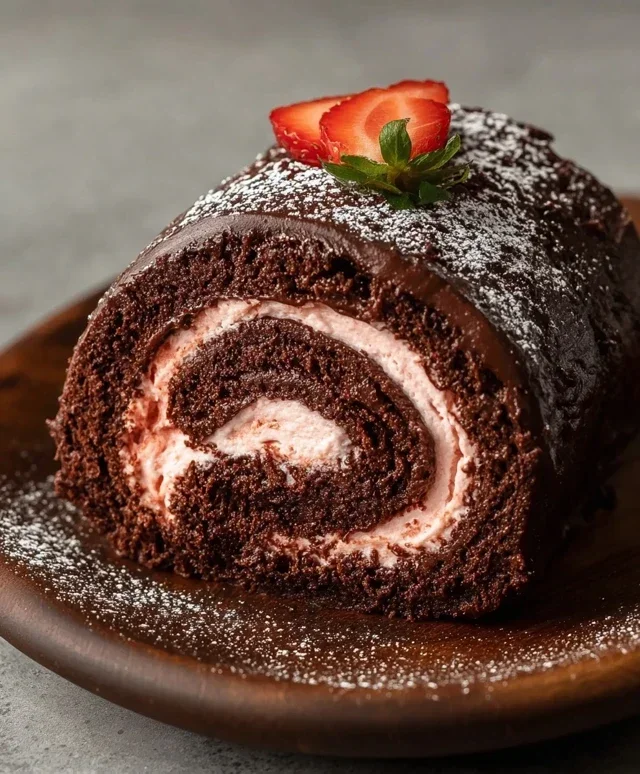
Get ready to impress yourself and your loved ones with this wonderfully easy Chocolate Swiss Roll! This recipe is designed to be approachable for bakers of all skill levels, and the best part is it’s completely vegan and gluten-free. The rich chocolate sponge, light and fluffy filling, and delightful strawberry garnish make this a showstopper that tastes as good as it looks. Don’t be intimidated by the Swiss roll; with these clear instructions, you’ll be rolling like a pro in no time.
Ingredients:
Let’s Get Baking!
First things first, preheat your oven to 175°C (350°F). Line a 25cm x 35cm (10 x 14 inch) baking pan with parchment paper, ensuring the paper extends slightly over the edges to help you lift the cake out later. This step is crucial for easy removal. In a medium bowl, whisk together the oat flour, cassava flour, 30g of the cocoa powder, arrowroot starch, baking powder, and baking soda. Make sure everything is well combined to ensure even leavening. Set this dry mixture aside.
In a separate large bowl, or the bowl of your stand mixer, begin extract whipping the aquafaba. This is the magic ingredient that creates a light and airy texture, similar to egg whites. Start on medium speed and gradually increase to high. You want to whip it until it forms stiff peaks, which means when you lift the whisk, the peaks stand up on their own. This process can take about 5-8 minutes. Once you have stiff peaks, gradually add 100g of the granulated sugar (or coconut sugar) a tablespoon at a time, while continuing to whip. Continue whipping until the meringue is glossy and firm.
Now it’s time to bring the wet and dry ingredients together. Gently fold the unsweetened applesauce and dairy-free yogurt into the aquafaba mixture. Do this in two additions, folding carefully to avoid deflating the whipped aquafaba too much. Once these are incorporated, it’s time to add the dry ingredients. Add them in two or three additions, gently folding them into the wet mixture. Be very careful not to overmix; you want to maintain as much air as possible. A few small streaks of flour are okay.
Carefully spread the batter evenly into your prepared baking pan. The batter will be quite thick. Use an offset spatula to ensure an even layer across the entire pan. Tap the pan gently on the counter a couple of times to release any large air bubbles. Bake for 15-18 minutes, or until the cake springs back when lightly touched and a toothpick inserted into the center comes out clean. Don’t overbake, as this can make the cake dry and prone to cracking.
While the cake is baking, prepare your clean kitchen towel. Lay a large, clean kitchen towel flat on your counter and liberally dust it with the 2 tbsp of cocoa powder. This will prevent the cake from sticking to the towel as it cools and will also give it a nice finish. As soon as the cake is out of the oven, invert it immediately onto the prepared cocoa-dusted towel. Carefully peel off the parchment paper. While the cake is still hot, gently roll it up, along with the towel, starting from one of the shorter ends. Allow the rolled cake to cool completely in the towel. This is the secret to getting a perfectly rolled shape without cracks.
Now for the luscious filling! In a bowl, cream together the room temperature vegan butter until light and fluffy. You can use a hand mixer or a stand mixer for this. Gradually add the remaining 100g of granulated sugar (or coconut sugar) and continue to beat until well combined and creamy. Scrape down the sides of the bowl as needed. In a separate bowl, take the solidified coconut fat from the top of your chilled full-fat coconut cream can. Whip this coconut fat until it’s light and fluffy. Gently fold the whipped coconut fat into the vegan butter mixture. Finally, fold in the pulsed freeze-dried strawberries. This creates a beautiful, flavorful, and slightly tart strawberry buttercream.
Once the cake has completely cooled, carefully unroll it. You should have a beautiful, flexible sponge. Spread an even layer of the strawberry buttercream over the entire surface of the cake, leaving a small border along the edges. Be generous, but don’t overload it, as this can cause it to squish out when you re-roll.
Re-roll the cake tightly, this time without the towel, using the towel as a guide if needed. Place the rolled Swiss roll seam-side down on a serving platter. You can dust the top with a little extra cocoa powder or powdered sugar for decoration. Garnish with the fresh sliced strawberries. For an extra special touch, you can whip a little more vegan butter and coconut cream for a simple frosting to spread on top before adding the strawberries. Chill the Swiss roll in the refrigerator for at least 30 minutes to firm up before slicing and serving. This makes it much easier to cut clean slices. Enjoy your delicious homemade Chocolate Swiss Roll!
Conclusion:
And there you have it – your very own delicious and surprisingly simple Chocolate Swiss Roll! We’ve designed this recipe to be as approachable as possible, proving that impressive desserts don’t need to be complicated. The light and airy sponge, combined with a rich chocolate filling, creates a truly delightful treat that’s perfect for any occasion. Whether you’re a seasoned baker or just starting out, I truly encourage you to give this easy chocolate Swiss roll a try. You’ll be amazed at how quickly it comes together and how much joy it brings to those who get to enjoy it.
For serving, a dusting of powdered sugar is classic, or you could add a dollop of whipped cream and fresh berries for an extra touch of elegance. If you’re feeling adventurous, consider adding a hint of coffee liqueur extract to your filling for a mocha twist, or even some chopped toasted nuts for added texture. Don’t be afraid to experiment and make it your own!
Frequently Asked Questions:
Why is my Swiss roll cracking when I roll it?
Cracking often happens if the sponge is overbaked, making it brittle, or if it’s rolled too tightly while still very hot. Ensure you bake until just set and let it cool slightly before rolling. A clean kitchen towel dusted with powdered sugar also helps to prevent sticking and cracking during the rolling process.
Can I make this ahead of time?
Yes, absolutely! You can bake the sponge the day before, let it cool completely, wrap it tightly in plastic wrap, and then assemble the roll the next day. The filling can also be made ahead and stored in the refrigerator.
What if I don’t have a Swiss roll pan?
No problem! A standard jelly roll pan (around 10×15 inches) works perfectly. Just make sure to grease and line it well with parchment paper for easy removal.
Easy Chocolate Swiss Roll
A simple and delicious dairy-free and gluten-free chocolate Swiss roll recipe, perfect for a special occasion.
Ingredients
-
135 g oat flour
-
30 g cassava flour
-
30 g cocoa powder
-
1 tbsp arrowroot starch
-
1 1/2 tsp baking powder
-
1/2 tsp baking soda
-
122 mL aquafaba, room temperature
-
200 g organic granulated sugar or coconut sugar, divided
-
100 g unsweetened applesauce, room temperature
-
60 g unsweetened dairy free yogurt, room temperature
-
2 tbsp cocoa powder for dusting the dish towel
-
1 cup sliced strawberries, for garnish
-
226 g vegan butter, room temperature
-
70 g freeze dried strawberries, pulsed into a flour
-
Coconut fat from 1 can full-fat coconut cream
Instructions
-
Step 1
Preheat oven to 175°C (350°F). Line a 10×15 inch baking pan with parchment paper and lightly grease. Dust a clean kitchen towel with 2 tbsp cocoa powder. -
Step 2
In a large bowl, whisk together oat flour, cassava flour, 30g cocoa powder, arrowroot starch, baking powder, and baking soda. -
Step 3
In a separate bowl, whisk together aquafaba and 100g of the sugar until light and foamy. Gently fold in the applesauce and dairy-free yogurt. -
Step 4
Pour the wet ingredients into the dry ingredients and mix until just combined. Pour batter into the prepared baking pan and spread evenly. Bake for 12-15 minutes, or until a toothpick inserted into the center comes out clean. -
Step 5
Immediately invert the cake onto the prepared cocoa-dusted towel. Carefully peel off the parchment paper. Starting from one short end, tightly roll up the cake and towel together. Let it cool completely. -
Step 6
While the cake cools, make the filling. Cream the vegan butter, remaining 100g sugar, freeze-dried strawberry powder, and coconut cream until smooth and fluffy. -
Step 7
Once the cake is cool, carefully unroll it. Spread the filling evenly over the cake. Roll up the cake again, this time without the towel. Garnish with sliced strawberries.
Important Information
Nutrition Facts (Per Serving)
It is important to consider this information as approximate and not to use it as definitive health advice.
Allergy Information
Please check ingredients for potential allergens and consult a health professional if in doubt.